|
|
|
Categories
|
|
Information
|
|
Featured Product
|
|
|
 |
|
|
There are currently no product reviews.
 ;
It was a complete manual as stated. Very good source for older product manuals. Thanks
;
Scan quality is very good. Price is very reasonable. If you're looking to purchase a copy of this manual, this is the one to get.
 ;
Perfect for my use.Could have better pictures,but otherwise perfect ;)
;
This is one of four manuals I have downloaded recently.
Purchase was very straight forward and the authorising email arrived in about 4 hours.
The quality of the scan is good. Print is clear and square to the page edges.
;
Exactly as advertized. High quality digital copy of the Nak 610 user manual. Easy download and access. Highly recommended.
®
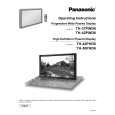
BV-60H/120H All-Tube Professional Series Guitar Amplifiers
4
Reverb
EFFECTS LOOP PAD 12dB ON EFFECTS LOOP
Channel 2
CH 2 CH 1 CHANNEL SELECT
Channel 1
PRESENCE
REVERB 2 REVERB 1
MASTER
LOW
MID
HIGH
GAIN
LOW
MID
HIGH
VOLUME
INPUT
3
5
6
7
8
9
10
11
12
13
14
15
16
17
18
The Front Panel:
1. POWER (not shown): This switch applies AC voltage to the amplifier, and should always be turned on first. The switch lights up when the AC power is on. 2. STANDBY (not shown): This switch activates the amplifier, and should always be turned on last. The switch lights up when the high voltage power is passing through to the tubes. NOTE: When you first power up this amplifier, leave the Standby switch OFF for at least 20 seconds. This gives the power tubes a chance to prepare themselves for action. 3. PRESENCE: Increase the level of upper harmonics with this control. The presence control allows a boost of up to 5dB at 10kHz. 4. EFFECTS LOOP PAD: This switch activates a 12dB pad on the effects send signal and corresponding gain recovery on the return. In the �out� position the signal is full strength which is best suited for line level rack mountable effects. With the switch �in� the signal is lower which is best suited for foot pedal type effects. 5. EFFECTS LOOP SWITCH: This switch controls the effects return signal of the effects loop. The loop is only active when the switch is pressed in. When a footswitch is used, this switch is disabled. The adjacent yellow LED glows when the loop is in use. 6,7. REVERB 2, REVERB 1: Adjust the amount of reverberation on each channel with these controls: at the "0" position the signal is "dry" (no reverb). As you bring the control up, the amount of reverb increases.
Channel 2:
8. MASTER: Set the output signal level of channel 2 with this control. At the "0" position (full left) very little or no signal will be heard; as you bring the control up (towards center) the output level of channel 2 increases. Use this control along with your guitar's volume and the channel 2 gain control (#12) to produce a wide variety of sounds. 9. LOW: Adjust the bottom end response with this control. The low control covers a range of 15dB at 100Hz. This sets the amount of heard (and felt) from the amp. 10. MID: Adjust the midrange response with this control. The mid control covers a range of 13dB at 500Hz. This controls the �voice� of your guitar. 11. HIGH: Adjust the high end response with this control. The high control covers a range of 10dB at 10kHz. This controls the �bite� of your guitar. 12. GAIN: Adjust the overdrive (distortion) level with this control. With the control towards �0� (to the left) the signal is relatively clean. As you bring the control towards �5� (center position) the distortion increases, along with the overall output level. Keep turning the control towards �10� and you�ll increase the distortion even more. 13. CHANNEL SELECT: Switch between channels with this push-button switch. The adjacent amber LED glows when channel 1 is selected (switch "out"), the red LED glows when channel 2 is selected (switch "in"). When a footswitch is used for channel switching, this switch is disabled.
Channel 1:
14. LOW: Adjust the bottom end response with this control. The low control covers a range of 16dB at 100Hz. This sets the amount of heard (and felt) from the amp. 15. MID: Adjust the midrange response with this control. The mid control covers a range of 20dB at 300Hz. This controls the �voice� of your guitar. 16. HIGH: Adjust the high end response with this control. The high control covers a range of 10dB at 10kHz. This controls the �bite� of your guitar. 17. VOLUME: Set the output volume level of channel 1 with this control. 18. INPUT: Connect your guitar or wireless receiver into this standard 1/4" jack using a shielded instrument cable.
4
|
|
|
> |
|