|
|
|
Categories
|
|
Information
|
|
Featured Product
|
|
|
 |
|
|
There are currently no product reviews.
 ;
Correct manual received and of good quality but the contents of the file for the Service Manual for the same monitor is for a 20" TV not the RGB Monitor.
;
The owners manual for the Pioneer VSX-D603S was exactly what I needed. I received it in a timely manor and it was priced fairly. I definately will use your servise again. Thank You
;
This is a great manual. It was easy to read and very accurate. The size of the manual is small so email is no problem. I highly recommend it. The manual is very hard to find other than this website.
;
Manual was complete and available promptly, since I had lost my original manual. Very good response.
;
Whilst this is a photo copy, and some of the pages are a little askew, it was all readable and intact. A real bonus finding an old manual for a classic piece of kit that no other site had.
Great stuff.
Option 1�Wood, metal or plastic molding
When you are using wood, metal or plastic molding, the wood frame should line up with inside wall as shown.
s
Use 1" (2.5 cm) or thicker lumber for wood frame.
A
ABC
B
D
C
A. Outside width B. Outside height C. Depth A. Molding B. Inside wall C. Wood frame D. Louvers
4. Apply wood preservative to the outside exposed surface. 5. Insert the frame in the wall opening. Square and level frame. 6. Attach frame securely to the wall.
Option 2�Plastered wall with no molding
If the plastered wall is to be flush with the cabinet and no molding is used, the wood frame must be set ¹��" (13 mm) into the inside wall.
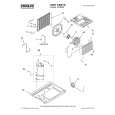
Install Cabinet into Wood Frame
1. Insert cabinet into the framed wall opening. The top of the cabinet should extend ¹��" (13 mm) into the room. If there is trim, the cabinet should extend ¹��" (13 mm) past the trim.
AB
C
D
B A
A. Plastered wall B. Inside wall
C. Wood frame D. Louvers
A. ¹��" (13 mm) extending into room B. Trim
Install Wood Frame
1. Construct wood frame. See �Location Requirements� for dimensions. 2. Measure outside width and height of frame to determine wall opening dimensions. 3. Cut opening through the wall. Remove and save insulation. NOTES:
s s
2. Use a level to check that cabinet is level side to side.
A
A. Level
Dimension for depth depends on wall thickness and type of molding. Do not block louvers in air conditioner cabinet.
3. Check that air conditioner cabinet is tilted to the outside so that water will run to the outside. 4. Reuse the insulation to seal opening between cabinet and frame. 5. Use existing holes and 6 - #10 x 1" wood screws (not provided) to attach cabinet to frame. NOTE: Do not overtighten screws or cabinet will distort and provide a poor air seal between cabinet and air conditioner. 6. Caulk all outside wall openings around cabinet.
9
|
|
|
> |
|