|
|
|
Categories
|
|
Information
|
|
Featured Product
|
|
|
 |
|
|
There are currently no product reviews.
 ;
Thanks for offering this item at such a good price. Proved handy in identifying the part I was looking for my set.
;
Thr Video Recorder i have is quiet Old and the Producer could Not help me. So i w as very glad to find an offer for the owners Manual for a very fair Price.a I obtained the original Manual very quick and I am happy to have it now.
 ;
The PDF copy was immediately available on download after the payment. However, I noticed that the document was in German, and Ihad to contact a German translator to get it translated it to English. The quality of document is legible can be used for my purpose.
;
The manual was complete and of great quality. Originally a tri-lingual file, I first received only one language. After a note to owners-manuals.com, I quickly received the remaining languages... Great service, definitely worth it.
;
Thank you for providing this manual and at low cost.
The Philips scope is of excellent quality, longevity and build and had a couple of faults
when it was passed to me. Having the CCT diagrams is a blessing.
I have fixed the problems and also modded the scope to my requirements.
I have built a 24v Li-Ion pack for portable use from old but good laptop batts.
it is working beautifully and I am well pleased. Keep up the good work Guys.
Jääkaappi-pakastimen esittely
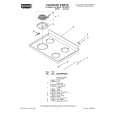
1. Käännä termostaatti tai termostaatit asentoon �0�. 2. Kallista laitetta taaksepäin, jotta pääset käsiksi alasaranan ruuveihin 1, 2 ja 3 (kuva 2). Ruuvaa ne auki 8 mm:n kuusioavaimella. Irrota sarana ja sitten pakastimen ovi.
Q R S
Kuva 2 3. Pidä jääkaapin ovea auki, avaa ruuvit 4 ja 5 (kuva 3) ristikantaruuvimeisselillä, irrota saranat ja sitten jääkaapin ovi.
U
Kuva 1
T
Ovien kätisyys
Laitteen ovien kätisyyttä voi muuttaa. Se tehdään seuraavalla tavalla: Kytke laite irti sähköverkosta ennen toimenpiteen aloittamista. Tyhjennä laite ja poista ritilät sekä laatikot. Kuva 3 4. Poista keskimmäisen saranan vasemmalla puolella olevat, kiinnitysreikiä peittävät muovisuojukset ja laita uudet, laitteen mukana toimitetut muovisuojukset toiselle puolelle. 5. Ruuvaa auki ylempi tappi 6 (kuva 4) 6 mm:n hylsyavaimella ja kiinnitä se toiselle puolelle. 6. Irrota jääkaapin oven ylemmän tapin tuki ja toisella puolella oleva tuen suojus 7 (kuva 5). Vaihda osat. (Toimi samalla tavoin myöspakastimen ovea varten). 117
Aseta suojus (kangas, pahvi) lattialle laitettavien esineiden alle, jotta ovet eivät vahingoitu irrotustoimenpiteiden aikana.
Untitled-2
117
28/08/2002, 09:48
|
|
|
> |
|