|
|
|
Categories
|
|
Information
|
|
Featured Product
|
|
|
 |
|
|
There are currently no product reviews.
 ;
This manual covers the main equipment features only. While it also includes the procedure for saving and loading from the now long obsolete memory cards it does not mention the how to operate with the optional floppy drive interface so I am still at a loss about how to use this! Note that there is a separate manual covering the MIDI interface and programming via the keyboard, not included in this download. You will also need to get hold of this if you want to use the MIDI interface properly. Basically there is little difference between this manual and the free to download manual for the similar PR60 model.
;
Good list of manuals. I found a very rare one and easily get. Should be promptly to download, as we must to wait hours even after confirmed payment.
;
The manual was properly scanned and perfectly readable. The only small problem is that I couldn't use my dear Ctrl + F to find a word I needed.
;
Nothing wrong with the manual or the delivery - came to me the same day I ordered it. But afterwards I realized that I ordered the wrong manual. Probably better with the Quick start - version. So maybe it would be better if we could see a list with inhold for each manual before ordering?
 ;
Bought T4850 High End Tuner a few years ago, but i didn't know where all the buttons were used for. So i purchased the owners manual. Perfect! Just what i needed.
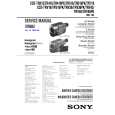
1-1-3.Precaution 1. Setting the Switch Unless otherwise specified, set the switches as follows and perform adjustments without loading cassette. 1. POWER switch (MA-345/346 board) .................... CAMERA 2. NIGHT SHOT switch (Lens Block) ................................ OFF (Night shot model) 3. DEMO MODE (Menu display) ....................................... OFF 4. DIGITAL ZOOM (Menu display) ................................... OFF 5. STEADY SHOT (Menu display) .................................... OFF 6. DISPLAY (Menu display) ................................. V-OUT/LCD
Yellow
7. 8. 9. 10. 11.
FOCUS switch (MF-8500) .................................... MANUAL PROGRAM AE (CF-60/61 board) .................................. Auto BACK LIGHT (CF-60/61 board) .................................... OFF PICTURE EFECT (CF-60/61 board) .............................. OFF 16 : 9 WIDE (Menu display) ........................................... OFF
2. Adjusting Procedure Adjust in the given order.
Cyan
Color bar chart standard picture trame H
Green White Magenta
Blue
Electronic beam scanning frame
Red
0 ± 0.1 msec
Magenta Yellow Green White Cyan Blue Red
CRT picture frame
AB
A=B
BA Enlargement
V Fig. b. (TV monitor picture)
Fig. a. (Video output terminal output wavefom) Difference in level
A
B
Adjust the camera zoom and direction to obtain the output wavefom shown in Fig. a and the TV monitor display shown in Fig. b.
Fig. 5-1-5.
3. Subject 1) Color bar chart (Standard picture frame) Adjust the picture frame as shown in Fig. 5-1-5. if adjustments are performed using the color bar chart. (Standard picture frame) 2) White pattern (Standard picture frame) Remove the color bar chart from the pattern box, and insert a clear chart in its place. (Do not perform zoom operations during this time.) 3) Chart for flange back adjustment Combine a white A0 size (1189 mm x 841 mm) paper to a black one, and make the chart shown in Fig. 5-1-6.
White 841 mm Black
1189 mm
Fig. 5-1-6.
Note : Use the non-reflecting and non-glazing vellum paper whose size is more than A0, and make the boundary between white and black to be smoothly flat.
5-5
|
|
|
> |
|