|
|
|
Categories
|
|
Information
|
|
Featured Product
|
|
|
 |
|
|
There are currently no product reviews.
 ;
My first manual from Owner-Manuals.com but not the last! I am very satisfied with the easy ordering and promt delivery of a manual I did not find anywhere else.
 ;
This manual is very helpfull to use the Power Supply. All technical information has been available.
For service use the circuit diagrams are very good.
Thanks .
;
Very comprehensive document which is a must-have for any Satellit 2100 owner whose set up is somewhat intricate. Due to the bad quality of the pictures that are rather dark and a bit blurred I gave 4-star feedback.
;
The manual was missing 2 pages but when I presented the problem to the company they made every attempt to get the 2 pages to me, when they couldn't they refunded my money. A very pleasing and easy transaction. The manual they provided was the original, it was concise and to the point. I plan to do business with this company again when should the need arise.
;
The owners manual is very good. all my how to questions were answered in detail.
Care and Cleaning
Be sore all controls are OFF and all cooktop parts are cool before cleaning�
Cleaning Chart
Parts Control Knobs Cleaning Procedure � Remove knobs in the OFF position by pulling each knob straight up. � Wash in dishwasher or in warm. soapy water. Do not soak or use abrasive cleaners such as steel wool pads� Rinse and dry. � Replace knobs, matching the flat part of the knob opening with the flat part of the shaft. Make sure knobs are in the OFF position. NOTE: When knobs are removed for cleaning, be careful not to spill liquids through the holes in the control area.
� ��4�o�� ��� ����� ��, ��� �� �� �� b, ��� �������� ������� ���*�� ��, ����� ��
Glass Cooktop
� Wipe with a clean, damp sponge or cloth. Rinse and dry thoroughly to prevent a filmy residue. A glass cleaner may be used to remove smudge marks and stains. � Clean with a toothbrush and warm soapy water. Rinse and dry thoroughly. DO NOT STRIKE or PRY the ignitor. (Refer to illustration of surface burner head.) � Never wipe a warm or hot porcelain enamel surface with a damp cloth. For general cleaning, wipe with soapy cloth, rinse and dry. To remove grease, spray with cleaners such as Fantastik or 409*. DO NOT use abrasive cleaning agents. They may damage the surface. � Wash them with warm. soapy water and a nonabrasive, plastic, scrubbing pad or in the dishwasher. For stubborn soils, clean with a soap-filled, nonabrasive, plastic pad or Cooktop Cleaning Creme* tPart # 2000000 l/and a sponge. � The grates are made of porcelain on cast iron and are very durable, however, they will gradually lose their shine and/or discolor. This is due to exposure to high temperatures from the gas flame. � When replacing the grates, carefully align the tab on the grate with the indentation in the porcelain burner base. If the grates are not properly aligned, they may rock.
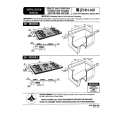
Ignitors
Porcelain Burner Pan
Surface Burner Grates
Surface Burner Heads
� The surface burner heads are removable.
The cap ca _poas
.UR.tR._AP
portion of the head is porcelain and the port area with mild detergent and a plastic scrubber.
Indentation
is aluminum. Wash the burner heads in the sink PPoa, n_P°r_s � Check to be sure all ports are open, To open w_t_ P_., clogged ports, insert a straight pin directly into each port. Do not enlarge or distort the port. � When replacing the burner heads, carefully align the tab on the burner base with the indentation in the head. The two pins will fit in the slots when the tab is aligned with the indentation. _a__n_o,
_" ]/'_ _ _'_/_]"_Tab
BURLIER BASE
NOTE: When burner heads are removed for cleaning, do not spill liquids through the holes in the burner base.
� Brand
namesare
trademarks
of the
respective
manufacturers.
|
|
|
> |
|