|
|
|
Categories
|
|
Information
|
|
Featured Product
|
|
|
 |
|
|
There are currently no product reviews.
 ;
I am very happy with the owner's manual. I bought a used Casio and was so relieved that I was able to get a hold of a owner's manual. It was very easy to download the manual and I had no problems with printing it. Thank you! Nancy Whalen
;
The purchased manual is an high-quality scan of the original JVC paper-based Owner´s Manual. I am very satisfied!
;
Very satisfied with received document, all is right, Thank You very much, it was a Pleasure to work with You.
 ;
great site, the most easy and fastest way to find the manual you need, no 5 star because the manual was only available in german, but I speak german as well so no problem for me.
;
thanks for this download i got a pioneer bdp-lx70a blu-ray player and it had no manual i search everywhere on the internet and came across owner-manuals.com and i found that it was so easy to find and downloaded from this site if i ever need a manual again this would be the first place that i would come too thanks guys
42009aFR.fm5 Page 1 Sunday, January 2, 2000 3:02 PM
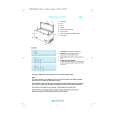
FICHE PRODUIT
1. Poignée. 2. Serrure. 3. Joint. 4. Cloison interne. 5. Bouchon de la goulotte d'évacuation de l�eau de dégivrage. 6. Bandeau de commande.
F
7. Grille d�aération du compartiment moteur. 8. Bord supérieur.
Commandes
1. Thermostat : Permet de régler la température interieure du congélateur.
1
2. Voyant rouge : S'allume pour indiquer que la température intérieure du congélateur n'est pas encore sur la valeur maxi. 3. Voyant vert : S'allume pour indiquer que l�appareil est en marche.
1
2
3
4. Bouton lumineux orange : Appuyez dessus pour activer/désactiver la fonction congélation rapide. S'allume pour indiquer que la fonction congélation rapide est en cours.
4
1
2
3
Les touches du bandeau de commande peuvent varier d'un modèle à l'autre. Remarques : Pour ne pas compromettre le fonctionnement de l'appareil et éviter d'endommager la porte lors de l'ouverture, nous vous conseillons de laisser un espace d'au moins 7 cm par rapport aux parois arrière et latérales. Après avoir installé l'appareil, nous vous conseillons d'attendre au moins deux heures avant de le brancher afin que le circuit réfrigérant soit efficace. Laissez l�appareil branché, même lorsqu'il est vide pendant de courtes périodes. La formation de givre sur le bord supérieur ou sur les parois intérieures de l�appareil est un phénomène naturel et ne compromet en aucune façon les performances du congélateur.
GB
F
E
|
|
|
> |
|