|
|
|
Categories
|
|
Information
|
|
Featured Product
|
|
|
 |
|
|
There are currently no product reviews.
 ;
I was very pleased with the manual I got for my amateur (ham) radio. Without it I could not figure out how to input and/or change the P/L setting on my radio. It drove me nuts as the radio was essentially useless. That all changed when my manual came. Then it took only minutes and I was done. Now my radio works fine. This is an exceptionally good resource as it's a very easy and user friendly download. Thank you very much! Dziękujemy za!
 ;
It answered my question, which was how to load the paper. I did notice that the very end of the manual was not visible.
;
The product manual I received was exactly what I was looking for, delivered painlessly at a very fair price. I can't ask for any more than that.
;
Very well done!!!!! congratulations. It was a bit longer than usual the wiating time even if it was on time (in 24 hours).
;
Last week I bought a second hand BAUKNECHT TRK4850 DRYER. It is a professional machine with many programs and switch options. I feared it would be a huge quest to find a manual. I was delighted when I found owner-manuals.com. After payment I received the file to download the next day already. The quality is great. I am very happy. Thanks!
but kindly the distributions of the operating programs not find in the owners manual,can you help me to understand the operating programs instructions thank you
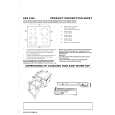
2 The battery icon
3.2.1
!
Install battery
Warning Always use AAA rechargeable batteries supplied with your unit. There could be risk of battery leakage if you use alkaline batteries or other battery types.
3
on the display blinks during charge. The battery icon becomes steady when the handset is fully charged.
1 Slide out the battery cover.
2 Place the batteries in the correct
polarity as indicated and replace the cover.
Note Optimal battery life is reached after 3 cycles of complete charging (over 15 hours) and discharging, allowing approximately 12 hours of talk-time and 150 hours of stand-by time. The indoor and outdoor range of the phone is up to 50 metres and 300 metres respectively. When the handset moves beyond the operation range, the antenna icon will blink. Tip When reaching the range limit and the conversation becomes crackly, move closer to the base.
3.2.2 Charge battery ! Warning The handset must be charged for at least 24 hours before using it for the first time. When the battery level becomes low, the low battery sensor alerts you by sounding an audible tone and blinking the battery icon. If the battery level becomes exceedingly low, the phone automatically switches off shortly after the alert and any function in progress will not be saved. 1 Place the handset on the charging cradle of the base station. A beep is emitted if the handset is placed correctly. 12
3.3 Welcome mode Before you first use your handset, you need to configure it according to the country of use. After charging it for a few minutes, the word WELCOME appears in various languages. Follow these steps to configure your phone: Note Depending on your country, the WELCOME screen may not appear. In this case, you are not required to select your country/operator/language settings. You can still make outgoing calls or receive incoming calls without first defining your country selection. However, you cannot use the answering machine function until you have selected your country. Getting started
|
|
|
> |
|