|
|
|
Categories
|
|
Information
|
|
Featured Product
|
|
|
 |
|
|
There are currently no product reviews.
 ;
El producto satisface las necesidades del servicio t
;
This is a good quality scan of the Operation & Maintenance (Service) Manual for the PAL version of this high-band broadcast umatic, BVU-800P
All schematics and lineup procedures appear to be included in this one manual AFAICT.
The file size is just over 113 MB which gives an idea of the quality and number of pages.
All of the schematics, which contain some fairly small print, are easily readable when you zoom into the page.
John Thompson, Newcastle Upon Tyne, England.
;
Good quality, all schematics of few of models. There is also short form of user manual and regulation manual.
;
Perfect copy of the service manual. you can enlarge every page, and it comes up
with all details.
;
It´s very very nice manual with all, what i need. Original in good quality. Very fast business. Very much thanks...
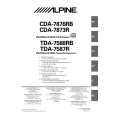
Installation
Metal plate
3
Slide the CDA-7876RB/CDA-7873R/TDA7588RB/TDA-7587R into the dashboard. When the unit is in place, make sure the locking pins are fully seated in the down position. This can be done by pressing firmly in on the unit while pushing the locking pin down with a small screwdriver. This ensures that the unit is properly locked and will not accidentally come out from the dashboard. Install the Detachable Front Panel.
Detachable Front panel
Caution When you install this unit in your car, do not remove the Detachable Front Panel. If the Detachable Front Panel is removed during installation, you might press too hard and warp the metal plate that holds it in place.
1
Bracket
Rubber Cap (Included) Hex Bolt (Included) Dashboard
Lock pin
Removal 1 Remove the detachable front panel. Use a small screwdriver (or similar tool) to push the locking pins to the "up" position (see above drawing). As each pin is unlocked, gently pull out on the unit to make sure it does not re-lock before unlocking the second pin. 3 Pull the unit out, keeping it unlocked as you do so. <JAPANESE CAR> 2
Mounting sleeve (Included) CDA-7876RB/CDA-7873R/TDA-7588RB/TDA-7587R
Slide mounting sleeve from main unit (see "Removal" on this page). Slide the mounting sleeve into the dashboard.
2
Metal Mounting Strap Screw Front frame
�
Hex Nut (M5)
Bolt Stud
Screws (M5 � 8) CDA-7876RB/CDA-7873R/ TDA-7588RB/TDA-7587R (Included)
CDA-7876RB/CDA-7873R/TDA-7588RB/TDA-7587R
When your vehicle has the Bracket, mount the long hex bolt onto the rear panel of the CDA7876RB/CDA-7873R/TDA-7588RB/TDA-7587R and put the Rubber Cap on the hex bolt. If your vehicle does not have the Mounting Support, reinforce the head unit with the metal mounting strap (not supplied). Connect all the leads of the CDA-7876RB/CDA-7873R/TDA-7588RB/TDA7587R according to details described in the CONNECTION section.
NOTE For the screw *, provide a proper screw to the chassis installing location.
Mounting Bracket
39-EN
|
|
|
> |
|