|
|
|
Categories
|
|
Information
|
|
Featured Product
|
|
|
 |
|
|
There are currently no product reviews.
 ;
Excellent printing quality.
A complete and very usefull service manual with all details.
GREAT SERVICE AT VERY LOW PRICE!
A++
;
Excellent printing quality.
A complete and very usefull service manual with all details.
GREAT SERVICE AT VERY LOW PRICE!
A++
;
Excellent printing quality.
A complete and very usefull service manual with all details.
GREAT SERVICE AT VERY LOW PRICE!
A++
;
Excellent printing quality.
A complete and very usefull service manual with all details.
GREAT SERVICE AT VERY LOW PRICE!
A++
;
Excellent printing quality.
A complete and very usefull service manual with all details.
GREAT SERVICE AT VERY LOW PRICE!
A++
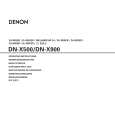
CD-CH1000H/CD-CH1000W
Mark position Be sure to assemble the tray into this position. 191~196 TRAY1~TRAY6
142 LIFT GEAR A 145
Insert it along the guide of the change box. 132 133
,,,, ,,,, ,,,,
146 110 147 130 TRAY No.1~6 135 111 141 143 144 140 Rear surface: Stamped. Note: During insertion, Do not accidentally rearrange tray numbers.
,, ,,
Rear side
Tray installing method: (After adjusting the height of the STB holder) 1. Turn the mode big gear to the mark position to lower the STB holder to the bottom area. 2. From the front side, install the tray. (Securely insert it to the lock position.)
140 TRAY 6 TRAY 5 TRAY 4 TRAY 3 TRAY 2 TRAY 1
130 135
Figure 23
Measure to be taken when a disc cannot be removed due to a mechanism trouble
First, remove the mechanism unit section from the set, and check for the state of the disc. (Remove the top plate R if necessary.) <State of the disc> (1) When the disc is in the normal PLAY (chucking) position -> Try to eject the disc by turning the mode big gear/tray big gear manually. * At this time, be sure to adjust the tray's position (height). (2) When the disc is in the normal STOCK position -> Try to eject the disc by turning the tray big gear manually. * At this time, be sure to adjust the tray's position (height). (3) When the disc is not in the normal position -> The tray or disc is not in the normal position. (The tray or disc may catch somewhere.) Remove the TOP PLATE F/DISC OB lever. Unlock the tray lock lever and pull out the tray which is not caught. Move the caught tray or disc and remove the disc. In case of (1) and (2), the mechanism is normal (defective circuit parts, etc.). However, it may stop somewhere. This is the reason why you should try to turn the tray big gear first. In case of (3), either of the big gears does not turn. � 23 �
|
|
|
> |
|