|
|
|
Categories
|
|
Information
|
|
Featured Product
|
|
|
 |
|
|
There are currently no product reviews.
 ;
Thank you for your manual It has the basic things to and i use the Oszi for Longer Time.
THX
;
Actually, I was looking for this information for 3 years!...now thanks to you, the manual is on my hands and of great help, cause I understand now where I was doing wrong connections and wires...excellent, I'll be back to you if in need, thank you.
 ;
This manual covers the main equipment features only. While it also includes the procedure for saving and loading from the now long obsolete memory cards it does not mention the how to operate with the optional floppy drive interface so I am still at a loss about how to use this! Note that there is a separate manual covering the MIDI interface and programming via the keyboard, not included in this download. You will also need to get hold of this if you want to use the MIDI interface properly. Basically there is little difference between this manual and the free to download manual for the similar PR60 model.
;
Good list of manuals. I found a very rare one and easily get. Should be promptly to download, as we must to wait hours even after confirmed payment.
;
The manual was properly scanned and perfectly readable. The only small problem is that I couldn't use my dear Ctrl + F to find a word I needed.
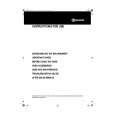
ADVANCED OPERATIONS
ADVANCED TECHNIQUES
Technique 3: Real Time Cue and Cue Point Sampler
LOOP OUT /EXIT
LOOP IN/ REAL TIME CUE/OUT ADJUST
D
'
� TIME MODE AUTO CUE
PROFESSIONAL
COMPACT DISC PLAYER
CDJ-700S
TEMPO ±10/±16 MASTER TEMPO
Set a cue point on the fly, and sample the currently playMASTER TEMPO
OPEN
TRACK SEARCH 4 ¢ IN/REALTIME CUE OUT/EXIT LOOP SEARCH OUT ADJUST RELOOP
RELOOP
1
¡
CUE
CUE
PLAY/PAUSE � REV + FWD
TEMPO
6
TEMPO
PLAY/ PAUSE
ing track. 1. During playback, press the LOOP IN/REAL TIME CUE button. 2. Press the CUE button with timing that will give the playback an accent. ÷ Playback will return to the cue point set in step 1. 3. In rhythm to the piece, press the PLAY/PAUSE button (6). ÷ The track will play from the cue point. ÷ If you press the CUE button instead of the PLAY/ PAUSE button, sound will be produced only as long as the button is pressed. ÷ By repeating steps 2 and 3 in a way that matches the track being played, you can create playback that sounds like a sampler is being used.
Technique 1: Master Tempo and Seamless Loop
To cover the currently playing track, create a loop on the standby track matching the same tempo and without changing the pitch. 1. Set MASTER TEMPO button to ON. ÷ The MASTER T. indicator lights on the display. 2. Move the TEMPO slider to adjust the tempo of the standby track to that of the current track. 3. At the point you wish to begin the loop, press the LOOP IN/REAL TIME CUE button. 4. At the point you wish to end the loop, press the LOOP OUT/EXIT button.
Technique 4: Loop and Reloop ----Short Cut---Make a track composed of the introduction and ending only. 1. While standing by to play the next track, creat a loop containing only the ending portion of the track. 1 Press the LOOP IN/REAL TIME CUE button at the point you wish to start the loop. 2 Press the LOOP OUT/EXIT button at the point you wish to end the loop. 2. Press the track search button (4) to begin play from the beginning of the track. 3. Pay attention to the timing as the introduction finishes playing, and press the RELOOP button at the point just before the vocal portion begins. ÷ The play will shift to the set loop and play the track�s ending portion.
Technique 2: Real Time Loop and Reloop
Create a loop during playback, cancel the loop, and then return to the canceled loop. 1. During playback, press the LOOP IN/REAL TIME CUE button at the point you wish to begin the loop. 2. At the point you wish to end the loop, press the LOOP OUT/EXIT button. 3. When you no longer desire loop play, press the LOOP OUT/EXIT button or RELOOP button. ÷ The loop play will be canceled at the next phrase. 4. When you wish to return to the earlier loop, press the RELOOP button. ÷ Loop play will return to the same playback loop canceled in step 3.
NOTE: Set the Auto Cue mode to OFF when using this shortcut.
13
<DRB1215> En
|
|
|
> |
|