|
|
|
Categories
|
|
Information
|
|
Featured Product
|
|
|
 |
|
|
There are currently no product reviews.
 ;
I liked the price plus it had everything i needed to service the tv.
thankyou Tim Hertz
;
The manual is excellent, well detailed, and divided into two parts. Received very quickly. Thank you.
;
a solid deal - quick and without any problems.
I life in europe - with downloads no loosing time
once again
 ;
got exactly what i ordered in a very timely manner. will use again for other manuals
;
I'm happy. Good quality. Very helped me with my work..............................
CD-PC1881V
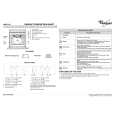
REMOVING AND REINSTALLING THE MAIN PARTS
CD MECHANISM SECTION
Perform steps 1, 2, 3 and 14-16 of the disassembly method to remove the CD mechanism.
How to remove the T/T up/down loading motor (See Fig. 11-1)
1. Remove the screws (A1) x 2 pcs., to remove the T/T up/ down loading motor.
T/T Up/Down Loading Motor Motor PWB
(A1) x2 ø2.6 x5mm
Figure 11-1
How to remove the pickup (See Fig. 11-2)
1. Remove the screws (B1) x 2 pcs., to remove the shaft (B2)x 1 pc. 2. Remove the stop washer (B3) x 1 pc., to remove the gear (B4)x 1 pc. 3. Remove the pickup. Note After removing the connector for the optical pickup from the connector, wrap the conductive aluminium foil around the front end of connector to protect the optical pickup from electrostatic damage.
Stop Washer (B1) x2 ø2.6 x6mm (B3) x1
Pickup Shaft (B2) x1 CD Mechanism Gear (B4) x1
Figure 11-2
� 11 �
|
|
|
> |
|