|
|
|
Categories
|
|
Information
|
|
Featured Product
|
|
|
 |
|
|
There are currently no product reviews.
 ;
got exactly what i ordered in a very timely manner. will use again for other manuals
 ;
I'm happy. Good quality. Very helped me with my work..............................
;
This is the second Manual I have ordered from owner-manuals, I give it five stars because it is exactly what I expected given the age of the equipment. So the contents look a bit aged and the pictures a bit grainy, it fulfills my needs and I am glad I can still get hold of them.
;
thank u so much for this manual that was so cheap that i thought it was a scam but i gambled anyway because it was too good of a deal to pass up and behold,the manual has everything and details of everything even the screws and im still amazed and very happy with my manual .so take my word and jump on it before they realize how cheap they selling thier manuals..thank you so much for taking time to read my thoughts
;
I do not have very much to say.
The price is quite covenient, delivery was better as promised (about 12 ours, against the specified 24 hours if I remember well), and the quality of the PDF is more than acceptable.
The Service Manual of Sansui R30 itself is also satisfactory: good graphic for schematics and layouts, simple and well structured.
Giovanni Bianchi
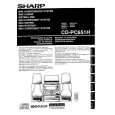
SETTING CLOCK RESETTING THE MICROCOMPUTER
Reset microcomputer under the following conditions:
(Main unit operation) Press ON/STAND-BY button to enter the stand-by mode. q To erase all of the stored memory contents (clock and timer
2 1 Press ON/STAND-BY button to enter the stand-by mode. 4 Press TUNING/TIME ( or ) button to select the time
Whilst pressing down button and the second.
(AM 0:00 PM 11:59) STAND-BY
In this example, clock set for q If the display is not correct. 24-hour (0:00) system. Within 5 seconds, press MEMORY/SET button. q If the operation is not correct.
Press the CLOCK button.
1 2 settings, tuner and CD presets).
3
button, hold down the ON/STAND-BY button for at least 1 CLOCK
1,2
2
display mode. "0:00" � The 24-hour display will appear.
ON/ "AM 0:00" � The 12-hour display will appear. TUNING/ TIME ( )
(0:00 23:59)
q The operation explained above will erase all data stored in q Note that this can only be set when the unit is first installed memory including clock timer settings, tuner and CD SET
"AM 12:00" � The 12-hour display will appear. (AM 12:00 PM 11:59) MEMORY/
Caution:
or it has been reset (see page 29). presets.
5 Press the MEMORY/SET button. 6 Press TUNING/TIME ( or ) button to adjust the hour.
q Press the TUNING/TIME ( or ) button once to advance
2 q When the 12-hour display is selected, "AM" will change autoNotes concerning use: the operation becomes erratic. 0.2 6 m minutes. and sensor on the main unit with a soft cloth. (8" 20')
the time by 1 hour. Hold it down to advance continuously. s Remote control
matically to "PM".
7 Press MEMORY/SET button. q Replace batteries the operating distance is reduced or if 8 Press TUNING/TIME ( o r ) button to adjust q Periodically clean transmitter LED on the remote control 3
4 Press TUNING/TIME ( or ) button once advance q Exposing sensor on the main unit to strong light may in1 5
by 1 minute. Hold it down to change time in 5 terfere with operation. Change lighting or the direction of minute intervals. the unit. 1
OPERATION MANUAL
�7�
0:00 AM 12:00 The hour setting will not even if minutes advance q Keep the remote control away from moisture, excessive heat,
"59" to "00". shock, and vibrations.
q The clock starts operating from "0" seconds.
9 Press the MEMORY/SET button. 5
(Seconds are not displayed.)
6
To see the time display:
7
Press the CLOCK button. q The time display will appear for about 5 seconds.
Note: q The clock display will flash on and off at push of the CLOCK button when the AC supply is restored after a power failure occurs or after the AC power lead is disconnected. If this happens, follow procedure below to change the clock time.
8
9
To change the clock time:
xPress the CLOCK button. yWithin 5 seconds, press the MEMORY/SET button. zPerform steps 6 9 above.
To change the time display mode:
xPerform steps 1 2 in the section "RESETTING THE MICRO-
COMPUTER", on page 29.
CD-PC671H/651H
yPerform steps 1 9 above.
|
|
|
> |
|