|
|
|
Categories
|
|
Information
|
|
Featured Product
|
|
|
 |
|
|
There are currently no product reviews.
 ;
Hi - happy with what I received but not quite what I wanted - my fault I assumed that service manual would also include operational instructions which is what I needed - all I needed to know was how to turn the radio - thanks
;
this Manual very important when i buy this Manual i already fix the trouble of my Camera..... thanks keep up the good work.!
 ;
This service manual helped me to repair my PIONEER. Iam very satisfied, that I found it here.
Even the price of manual was not so high that person would not be able to spend a few money.
But that is very worth spent money. Thanks
;
Excellent quality service manual. Quick processing, fair prices. Love to do business again. Thank you!!!
;
Excellent service manual, the only known point of note is the alignment of improvability scanned pages within the pdf page. The resolution is good.
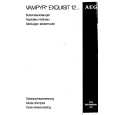
SECTION 3 DISASSEMBLY
Note : Follow the disassembly procedure in the numerical order given.
3-1. FRONT PANEL ASSEMBLY
1 Push the part A in the direction of arrow to remove the loading panel upward.
A part
5 Two screws (BVTP2.6x8)
7 Panel bracket
Claw
3 Connector (CN351)
6 Wire
8 Remove the front panel assembly with care to claws.
4 Connector (CN302)
(Flat type 23 core)
2 Three screws (BVTP3x8)
Claw
�5�
|
|
|
> |
|