|
|
|
Categories
|
|
Information
|
|
Featured Product
|
|
|
 |
|
|
There are currently no product reviews.
 ;
Another excellent aquisition. Fine detailed manual. Thanks
 ;
Good quality for the scan, complete, but as usual for Tascam, not so comprehensive !
;
great manual readable & easy to downlaod to be recommanded
;
Very useful, not the best scan, but definitely readable !
;
Complete service manual, good quality scan, great buy !
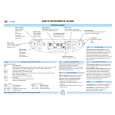
CDR-205TX DISASSEMBLING PROCEDURES-1
CD-R MECHANISM: REPLACEMENT OF OPTICAL PICKUP
The laser diode in the optical pickup block is so sensitive to static electricity, surge current and etc. That the components are liable to be broken down or its reliability remarkably deteriorated. During repair, carefully take the following precautions. Do not touch the optical pickup object lens with the hands.
PRECAUTIONS
1. Ground for the work-desk. Place a conductive sheet such as a sheet of copper (with impedance lower than 10Mohm) on the workdesk and place the set on the conductive sheet so that the chassis can be grounded. 2. Grounding for the test equipments and tools. Test equipments and toolings should be grounded in order that their ground level is the same the ground of the power source. 3. Grounding for the human body. Be sure to put on a wrist-strap for grounding whose other end is grounded. Be particularly careful when the workers wear synthetic fiber clothes, or air is dry. 4. Select a soldering iron that permits no leakage and have the tip of the iron well-grounded. 5. Do not check the laser diode terminals with the probe of a circuit tester or oscilloscope.
1
Remove the mechanism from the chassis.
2
1. Press the stopper of chucking plate to the arrow mark direction.
Chucking plate
Stopper
2. Remove the chucking plate.
|
|
|
> |
|