|
|
|
Categories
|
|
Information
|
|
Featured Product
|
|
|
 |
|
|
There are currently no product reviews.
 ;
Thank you for your manual It has the basic things to and i use the Oszi for Longer Time.
THX
;
Actually, I was looking for this information for 3 years!...now thanks to you, the manual is on my hands and of great help, cause I understand now where I was doing wrong connections and wires...excellent, I'll be back to you if in need, thank you.
 ;
This manual covers the main equipment features only. While it also includes the procedure for saving and loading from the now long obsolete memory cards it does not mention the how to operate with the optional floppy drive interface so I am still at a loss about how to use this! Note that there is a separate manual covering the MIDI interface and programming via the keyboard, not included in this download. You will also need to get hold of this if you want to use the MIDI interface properly. Basically there is little difference between this manual and the free to download manual for the similar PR60 model.
;
Good list of manuals. I found a very rare one and easily get. Should be promptly to download, as we must to wait hours even after confirmed payment.
;
The manual was properly scanned and perfectly readable. The only small problem is that I couldn't use my dear Ctrl + F to find a word I needed.
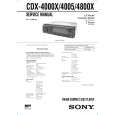
Attaching the front panel
Getting Started
Resetting the unit
Before operating the unit for the first time or after replacing the car battery, you must reset the unit. Remove the front pannel and press the reset button with a pointed object, such as a ballpoint pen.
Place the hole A in the front panel onto the spindle B on the unit as illustrated, then push the left side in.
A B
Reset button Note Pressing the reset button will erase the clock setting and some memorized functions such as the station memo.
x
Detaching the front panel
You can detach the front panel of this unit to protect the unit from being stolen.
Notes � Be careful not to attach the front panel upside down. � Do not press the front panel too hard against the unit when attaching it. � Do not press too hard or put excessive pressure on the display window of the front panel. � Do not expose the front panel to direct sunlight or heat sources such as hot air ducts, and do not leave it in a humid place. Never leave it on the dashboard of a car parked in direct sunlight or where there may be a considerable rise in temperature.
1 2
Press (OFF). Press (OPEN), then slide the front panel to the right side, and pull out the left side of the front panel.
1 2
Caution alarm
If you turn the ignition key switch to the OFF position without removing the front panel, the caution alarm will beep for a few seconds. If you connect an optional power amplifier and do not use the built-in amplifier, the beep sound will be deactivated.
Notes � Do not put anything on the inner surface of the front panel. � Be sure not to drop the panel when detaching it from the unit. � If you detach the panel while the unit is still turned on, the power will turn off automatically to prevent the speakers from being damaged. � When carrying the front panel with you, use the supplied front panel case.
6
 $4.99 CDX4005 SONY
Service Manual Complete service manual in digital format (PDF File). Service manuals usually contains circuit diagr…
|
|
|
> |
|


