|
There are currently no product reviews.
 ;
everything was fine - fast, readable, worth the price
;
I'm happy to get a manual from this rare old amp. The pdf is from good qualty.
;
very quick service and manual as described - would happily trade here again!
;
Fast Download,all pages present,an excellent copy.THis enabled to find the origional part numbers and chase them up. The cartridge is proving difficult to find but at least I know the origional part number.Thanks to all.
;
The manual was as described. Complete with parts list and technical information. Fast delivery.
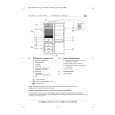
SECTION 4 MECHANISM DECK ASSEMBLY
Note: Follow the assembly procedure in the numerical order given.
OPTICAL PICK-UP COMPLETE ASS�Y
1 Move the lever (LOCK 3A) in the direction of the arrow A, and return it a little in the direction of the arrow B from the position where the chuck plate is moved down to the lower limit.
chuck plate
B A
3 stop ring 2.0 (E type)
4 tension spring (DH)
2 optical pick-up complete ass�y Note: Insert the shaft (A) first. shaft (A)
GEAR (LOMINI)/(LOAD 1) ASS�Y
gear (LOAD 2) 2 Attach the gear (LOMINI) at the position shown in Fig. A.
gear (LOMINI)
shaft (rotary prevention C)
chuck plate
B
1 Move the lever (LOCK 3A) fully in the direction of the arrow B to move the chuck plate up.
marking Fig. A
slit 3 Attach the gear (LOAD 1) ass�y with its facing inside. 4 stop ring 1.5 (E type)
19
|