|
There are currently no product reviews.
 ;
Excellent printing quality.
A complete and very usefull service manual with all details.
GREAT SERVICE AT VERY LOW PRICE!
A++
;
Excellent printing quality.
A complete and very usefull service manual with all details.
GREAT SERVICE AT VERY LOW PRICE!
A++
;
Excellent printing quality.
A complete and very usefull service manual with all details.
GREAT SERVICE AT VERY LOW PRICE!
A++
;
Excellent printing quality.
A complete and very usefull service manual with all details.
GREAT SERVICE AT VERY LOW PRICE!
A++
;
Excellent printing quality.
A complete and very usefull service manual with all details.
GREAT SERVICE AT VERY LOW PRICE!
A++
CDX-FM657
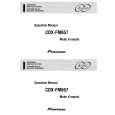
12. To see the amount of dislocation, place the mechanism upside-down. If the stopper bend has been dislocated in the direction of the first CD, turn VR802 to the left(Fig. 2). To lower the stage toward the sixth step by 0.1 mm, reduce the voltage of EREF (adjusted in step 8) by 20 mV. If the stopper bend has been dislocated in the direction of the sixth CD, turn VR802 to the right(Fig. 4). To raise the stage toward the first step by 0.1 mm, increase the voltage of EREF (adjusted in step 8) by 20 mV.
L.P.F.
VR802
EREF GND
47k� 1µF
13. Place the mechanism horizontal. Go back to step 11 to reconfirm the stage height. 14. When adjustment of the stage height is completed, proceed as follows: 15. Press the EJECT switch. 16. Once operation of the mechanism has stopped, turn the power OFF. 17. Wait more than one minute after the power is turned off, then turn the power ON and insert a magazine. 18. Check if the mechanism operates correctly with the first and fourth CDs. 19. If the mechanism operates properly, adjustment is completed. If the mechanism operates improperly, make the adjustment again.
Oscilloscope
43
|