|
|
|
Categories
|
|
Information
|
|
Featured Product
|
|
|
 |
|
|
There are currently no product reviews.
 ;
Very satisfied with received document, all is right, Thank You very much, it was a Pleasure to work with You.
 ;
great site, the most easy and fastest way to find the manual you need, no 5 star because the manual was only available in german, but I speak german as well so no problem for me.
;
thanks for this download i got a pioneer bdp-lx70a blu-ray player and it had no manual i search everywhere on the internet and came across owner-manuals.com and i found that it was so easy to find and downloaded from this site if i ever need a manual again this would be the first place that i would come too thanks guys
;
Superb! It's the original manual. We can now use our old calculator with its full function.
;
This is a very well written and comprehensive manual. It answered all our queries.
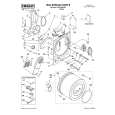
2. Insert cord brackets into slotted holes in rear panel and secure with screws provided.
Connect Vent
1. Using a 4" (10.2 cm) clamp, connect vent to exhaust outlet in dryer. If connecting to existing vent, make sure the vent is clean. The dryer vent must fit over the dryer exhaust outlet and inside the exhaust hood. Make sure the vent is secured to exhaust hood with a 4" (10.2 cm) clamp. 2. Move dryer into final position. Do not crush or kink vent. Make sure dryer is level. 3. (On gas models) Check to be sure there are no kinks in the flexible gas line.
A
Complete Installation
B C
A. Cord bracket B. Slotted hole C. Screw
1. Check to be sure all parts are now installed. If there is an extra part, go back through the steps to see which step was skipped. 2. Check to be sure you have all of your tools. 3. Dispose of/recycle all packaging materials. 4. Check the dryer�s final location. Be sure the vent is not crushed or kinked. 5. Check to be sure the dryer is on a level surface. 6. Plug into a grounded 3 prong outlet. Turn power on. 7. Remove the blue protective film on the console and any tape remaining on the dryer. Remove tape from the lint screen (located on inside back wall of dryer). 8. Read �Dryer Use.� 9. Wipe the dryer drum interior thoroughly with a damp cloth to remove any dust. 10. To test the dryer, set the dryer on a full heat cycle (not an air cycle) for 20 minutes and start the dryer. If the dryer will not start, check the following:
s s s
NOTE: Power supply cord may be wrapped around the brackets for storage convenience when dryer is not in use.
Install casters
1. Lay the dryer on its side. 2. Use the carton to prevent damage to the dryer.
Controls are set in a running or �On� position. Start button has been firmly pushed. Dryer is plugged into a grounded 3 prong outlet. Electrical supply is connected. House fuse is intact and tight, or circuit breaker has not tripped.
3. Screw casters into dryer base at four corners and tighten securely. 4. Set the dryer upright. In doing so, be careful that the dryer does not roll away from you. 5. NOTE: Permanent installations require 4 dryer feet. See �Assistance or Service� section for ordering information.
s s s
Dryer door is closed. 11. When the dryer has been running for 5 minutes, open the dryer door and feel for heat. If you do not feel heat, check the following:
s
Controls are set on a heated cycle, not an air cycle.
NOTE: You may notice a burning odor when dryer is first heated. This odor is common when the heating element is first used. The odor will go away.
9
|
|
|
> |
|