This manual is very helpfull to use the Power Supply. All technical information has been available.
For service use the circuit diagrams are very good.
Thanks .
Very comprehensive document which is a must-have for any Satellit 2100 owner whose set up is somewhat intricate. Due to the bad quality of the pictures that are rather dark and a bit blurred I gave 4-star feedback.
The manual was missing 2 pages but when I presented the problem to the company they made every attempt to get the 2 pages to me, when they couldn't they refunded my money. A very pleasing and easy transaction. The manual they provided was the original, it was concise and to the point. I plan to do business with this company again when should the need arise.
Irrespectively of this manual exist only germany language, it's useful - although i need some additional task to translate: My english is bad, but usable - but i really dont speak germany. :)
Text excerpt from page 13 (click to view)
3.
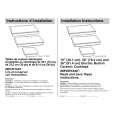
Fixing the first wall bracket No 2 Draw a horizontal line through the vertical at 15mm from the ceiling as illustrated, or from a horizontal line drawn between the top of two adjoining wall cabinets. Place the top edge of the bracket against the line, aligning the centre of the bracket with the vertical line. If, the alignment is correct mark the centres for the keyhole fixing screws (not supplied) as illustrated in Fig. 3. Fixing the second wall bracket No 2 Draw a horizontal line through the vertical at X. X is determined by the height of the upper chimney. Place the bottom edge of the bracket against the line, aligning the centre of the bracket with the vertical line. If, the alignment is correct mark the centres for the keyhole fixing screws (not supplied) as illustrated in Fig. 4. Splashback (Optional) When the splashback is to be fitted, the distance between the cooker hood and the cooking appliance will be determined by the height of the splashback B, as illustrated in Fig. 4. Position the splashback on the worktop, ensuring the worktop is level first, as illustrated in Fig. 4; then holding the splashback against the wall mark the position of the holes for the fixing screws. The splashback must be fitted before installing the cooker hood. If the splashback is to be fitted in conjunction with a slot-in cooker, or free standing appliance then it will be necessary to fix the splashback to the wall using both the top and bottom wall fixing screw holes. Drill the holes for the fixing screws using an 8mm masonry drill and fix the wall brackets. Note: If the hood is to be installed onto a hollow construction or plaster or partition board wall then special fixing screws will be required (not supplied).