|
|
|
Categories
|
|
Information
|
|
Featured Product
|
|
|
 |
|
|
There are currently no product reviews.
 ;
This is a great manual. It was easy to read and very accurate. The size of the manual is small so email is no problem. I highly recommend it. The manual is very hard to find other than this website.
;
Manual was complete and available promptly, since I had lost my original manual. Very good response.
;
Whilst this is a photo copy, and some of the pages are a little askew, it was all readable and intact. A real bonus finding an old manual for a classic piece of kit that no other site had.
Great stuff.
;
excellent quality, contains circuits and scan quality, 110 pages
;
It was easy done, and I got exactly what I was looking for.
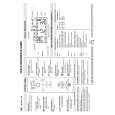
Removal
and cleaning unit
of interior with panels
components: removed.
Do not operate
I
--
5. Wash the interior components you have just removed with mild soap or detergent and warm water. Rinse in clean water. Sanitize in a solution of l/402. (8 ml) of chlorine laundry bleach mixed with 1 gallon (3.8 L) warm water.
NOTE:
Do not wash plastic Plastic parts can not withstand 145� F (63°C).
parts in dishwasher. temperatures above
6. Wash the storage bin, door, gasket, and ice scoop with mlld soap or detergent and warm water. Rinse with clean water. Sanitize with the chlorine bleach and water solution.
FIGURE 6
1. Remove ice retainer baffle by flexing and then slide it off the studs.
it (Figure
6) 7. Replace the interior components: water utor, hoses, water pan, and ice retainer. distrib-
8. Check
l l
the following: water valve is in water pan. (Figure holes and into 7). are water storage
Hose from Rubber Water facing
drain
plug
is in water is seated to
pan and
THUMB
SCREWS
l
distributor down. reconnected
l
Hose is distributor.
pump
!
l
FIGURE
7
Hose from water bin drain opening.
pan is inserted
2. Remove the �water thumb screws (Figure
pan 71.
by
unscrewing
the
two 9. Reconnect electrical harness. Replace cutter grid.
3. Remove the hose from rhe water pump. Clean the water inlet hose hanging in the water pan.
FIGURE
8
4. Remove the water d,stributor from the freezing plate. It is held in place by rubber end caps. Remove the inlet hose and clean all water distributor holes an@ the small orfice in the inlet side of the distributor. When replacing the distributor, make sure the end caps are located in the evaporator flange detents and that the water distributor holes face down.
5
|
|
|
> |
|