Irrespectively of this manual exist only germany language, it's useful - although i need some additional task to translate: My english is bad, but usable - but i really dont speak germany. :)
Excellent service from this company (including a total refund on an earlier purchase when through no fault of the company the manual was incomplete). I have purchased several manuals which I have been very satisfied with, as I am with this one. Highly recommended.
Manual was delivered in a timely manner and was all in English as advertised. The manuals I received when we moved into our flat were in German, Italian, and French. Having never used a steamer before, and not speaking/reading German very well, I needed an English Manual. this was a huge help.
Text excerpt from page 8 (click to view)
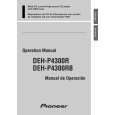
Mounting of cooker hood in a cupboard, Alt. 1 (Fig. 6):
Cut an opening and drill 4 holes in the underside of
B A C 2 1
the cupboard. Use the template printed on the packaging. � Mount the locknuts (A) on the cooker hood. �Mount the cooker hood with four screws (B) and washers (C).
Fig. 6
Mounting of cooker hood in a cupboard, Alt. 2 (Fig. 7):
Cut an opening in the underside of the cupboard. Use the template printed on the packaging. � Mount the cooker hood with two screws (A) and the spacers (B). � Fit the plastic covers (C).
B A C
Fig. 7
Mounting of cooker hood between cupboards (Fig. 8):
Fit the two brackets (A) on the cooker hood. � Mark out the exact location to drill in the sides of the cupboards. � Mount the cooker hood with four screws (B), washers (C) and the nuts (D).
D A
C
B
Fig. 8
Mounting of cooker hood on wall (Fig. 9):
Mark out where the 4 holes shall be drilled on the wall. Drill in the markings with an �8 mm drill and fit rawl plugs into the holes. Use the template printed on the packaging. � Fix the screws (A). Leave about 5 mm distance between the screws and the wall. � Hook the cooker hood on the screws (A). � Remove the grease filter and mount the screws (B) in the two lower holes. Remove the grease filter by pulling it backwards (against the wall) and then downwards. � Tighten the screws (A). � Mount the grease filter.
36
C A