|
There are currently no product reviews.
 ;
I never been disappointed in my dealings with owners-manuals.com
;
Excellent printing quality. A complete and very useful manual with all details.
;
Even if the PDF is a scan, I can read the information I need.
The price is affordable and the service (mail sending) is very fast.
Thanks ! Regards. William (Fan of Kenwood)
;
Very good quality original datasheet!I like this amazing website!!!!!!
 ;
Excellent just what I needed to replace the electrolytic caps and make this old gem a beauty again. Was as scan of the original photocopied service manual.
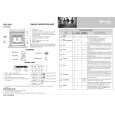
(4) Remove Front Frame
Remove 3 screws(l),then be careful not to be damaged the face of front filter. Attached the Stand with 4screw(a), then stand it vertically. When remove front frame.
F���� F���� Front Frame
Screw (�) S�������
S������� Screw (�)
Filter holder Screw(m) metal ï¼³ï½�ï½�ï½�ï½�ï¼�ï½�ï¼� ï¼ï½�ï½�ï½�â��ï½�ï½�ï½�ï½�ï½� Screw(m) ï¼³ï½�ï½�ï½�ï½�ï¼�ï½�ï¼�
(5) Remove Front Filter(Glass)
Remove 22 screws(m), and remove Filter hold Metal and Front Filter. Be careful not to fall down the front Filter. When remove the filter hold Metal. When attach the new Front Filter, remove protection film on a side(yellow tag is marked).Then attach to the Front Frame, locating the conducting electrode side to the inside, and attach Filter hold Metal.
Screw(m) S������� Front Filter (Glass) F�����F������G�����
Screw(m) S�������
Screw(m) S�������
S�������
Screw(m)
9
|