|
|
|
Categories
|
|
Information
|
|
Featured Product
|
|
|
 |
|
|
There are currently no product reviews.
 ;
Downloaded the Service manual OK of the Technics Piano and have now repaired it and its going fine. Excellant; thank you for the fine servce. A.M
 ;
This site is working fine! Did buy a manual for SX-EX25L and after a while I could download it and fix the problem. Nice and easy!
;
Complete manual as pdf-file in very good quality. Very helpful and fast availability.
;
Complete service manual in very good scanning quality with all schematic and PWB graphics as well as assembly & maintenance instructions. A slight drawback is that the rastering of the PWB graphics sometimes makes it a bit difficult to follow fine traces, but no showstopper.
;
Purchased the manual that I was looking for at a great price and could download it easily.. Great service experience and for future purchases I plan to use the site. Thank you very much
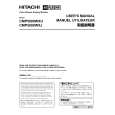
Y DRIVE, SCAN (A), (B) Assy
1
Remove the three screws.
7 8
Remove the Rear Case 50 (M). (Screws � 20) Remove the Y DRIVE Assy. (Connector, Screws � 8)
Y DRIVE Assy
8
Front Case 50 (M)
�2
8
�2
8 2 3 4
Loosen a rivet. Remove the Lead Cover MX. Pull out a Flexible Cable. SIDE KEY Assy
1
�3
8
�2
8
�2
2
Lead Cover MX
4
Rivet 3 Turn it not to press the rivet. (Because when the rivet presses, Lead Cover fit in once again.) MX It is easy to remove when pull out the Lead Cover MX with the rivet before completely removing the rivet.
5 6
Remove bottom by the fulcrum at the top of Front Case (50). Remove the Front Case (50).
9
Reverse the SCAN (A) and SCAN (B) Assemblies.
10 When it is necessary, exchange the ROM.
SCAN (A) Assy
Front Case 50 (M) ROM �6 Rear Case
6
Aluminum Materials It is the structure that a hook of Front Case (50) was put between with Rear Case and aluminum materials.
9
9 5
SCAN (B) Assy
140
|
|
|
> |
|