|
|
|
Categories
|
|
Information
|
|
Featured Product
|
|
|
 |
|
|
There are currently no product reviews.
 ;
The only reason I gave this less than 4 stars, is because it shouldn't take 24 hrs to have the download available. I was surprised to find that I had to wait until the next day to be able to download the manual that I paid for.
The manual itself is the correct manual.
 ;
Excellent replacement for original Owner´s Manual. I am totally satisfied!
;
Great service. Manual is as advertised and delivered when promised.
;
Perfect quality, highly appreciated service !!!
Fast delivery of the download info, no issues at all. Recommended E-manual shop !!!
;
hi owners manual- crew,
i am very satisfied about the trade with you.
if i need some other manuals, i will contact you again.
thanks
frank kappler
Réglage de la luminosité et du contraste (CONTR/LUMIN)
Ces réglages sont conservés en mémoire pour les signaux reçus du connecteur d�entrée actuellement sélectionné.
Réglage du centrage de l�image (TAILLE/CENTRAGE)
Ce paramètre est conservé en mémoire pour le signal d�entrée actuel.
1 Appuyez sur la touche MENU.
Le menu apparaît à l�écran.
1 Appuyez sur la touche MENU.
Le menu apparaît à l�écran.
2 Déplacez la touche de commande vers le haut ou
vers le bas pour mettre en surbrillance. Appuyez ensuite sur la touche de commande. Le menu CONTR/LUMIN apparaît à l�écran.
2 Déplacez la touche de commande vers le haut ou le
bas pour sélectionner TAILLE/CENTRAGE et appuyez sur la touche de commande. Le menu TAILLE/CENTRAGE apparaît à l�écran.
3 Déplacez la touche de commande vers le haut ou
vers le bas pour mettre en surbrillance 6 ou . Appuyez ensuite sur la touche de commande.
3 Déplacez la touche de commande vers le haut ou le
bas pour sélectionner pour un réglage horizontal ou pour un réglage vertical. Appuyez ensuite sur la touche de commande.
4 Déplacez la touche de commande vers le haut ou
vers le bas pour régler le contraste (6) ou la luminosité ( ). Appuyez ensuite sur la touche de commande.
4 Déplacez la touche de commande vers le haut ou
vers le bas pour ajuster le centrage.
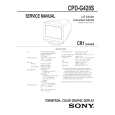
Si vous utilisez le mode sRGB
Si vous avez sélectionné le mode sRGB dans l�option MODE COULEUR ( ) dans le menu OPTION ( ), le menu CONTR/LUMIN suivant apparaît à l�écran.
CONTR / LUM I N s RGB
Réglage de la taille de l�image (TAILLE/CENTRAGE)
Ce paramètre est conservé en mémoire pour le signal d�entrée actuel.
FR
1 Appuyez sur la touche MENU.
Le menu apparaît à l�écran.
/
:
2 Déplacez la touche de commande vers le haut ou le
bas pour sélectionner TAILLE/CENTRAGE et appuyez sur la touche de commande. Le menu TAILLE/CENTRAGE apparaît à l�écran.
SORT I R : MENU
Vous ne pouvez régler le contraste (6) ou la luminosité ( ) dans cet écran. Si vous voulez les régler, sélectionnez un mode autre que sRGB dans l�option MODE COULEUR ( ) du menu OPTION ( ). Pour obtenir plus d�informations sur le mode sRGB, voir �Réglage de la couleur de l�image (COULEUR)� à la page 14.
3 Déplacez la touche de commande vers le haut ou le
bas pour sélectionner pour un réglage horizontal ou pour un réglage vertical. Appuyez ensuite sur la touche de commande.
4 Déplacez la touche de commande vers le haut ou
vers le bas pour ajuster la taille.
11
|
|
|
> |
|