|
|
|
Categories
|
|
Information
|
|
Featured Product
|
|
|
 |
|
|
There are currently no product reviews.
 ;
The delivery of this manual was very fast, less than 8 hours. The manual is very clear and concise, and helped a great deal in the repair and final setup of the Hitachi HMA-G2 Amplifier.
;
Great service. The manual was exactly what I was looking for: schematic + layout. I managed to fix the player. Highly recommended!
 ;
At $5,00 certainly good bang for your buck. Includes electric schematics as well as exploded parts view + parts list for reordering. Unfortunately no details on the PCB contents or working, but then again, this is not overly complex. Best bonus: this manual does contain the heavily searched for LED error codes as well as descriptions for test operation. Haven't gotten around to fixing the machine yet, one thing the manual won't do for you is getting it out of the kitchen assembly :-(
;
It`s not your fault tear down is rather incomplete. It doesn`t have complete instructions as to deconstruction for repair.
;
THANK YOU FOR A GOOD TRANSACTION, NICE COPY, CLEAR
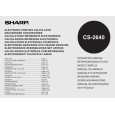
4. Ink ribbon replacement
1. Remove the paper roll from the calculator. (Tear the paper and remove it from the print mechanism by using .) 2. Set the power switch to OFF. Make sure that the print wheel has stopped. 3. Remove the printer cover by sliding it towards the back of the calculator. (Fig. 1) 4. Remove the used ribbon. 5. Install the new ribbon. 6. With the black side of the ribbon facing upwards, place one of the reels on the reel shaft on the right. (Fig. 2) Make sure that the reel is securely in place. 7. Thread the ribbon around the outside of the metal guides. (Fig. 3) 8. Take up any slack by manually turning one of the reels. 9. Replace the cover. 10. Replace the paper roll.
5. Paper roll replacement
1. Lift the paper holder up. (Fig. 1) 2. Fold the leading edge of the paper roll 3 to 5 cm. (Do not fold it slantwise.) (Fig. 2) 3. Insert the paper roll from the left side of the paper holder and make sure the paper roll is set in the proper direction (with the paper feeding from the bottom). (Fig. 3) 4. Insert the leading edge of the paper into the opening directly behind the print mechanism. (Fig. 4) 5. Press the paper feed key and feed the paper under the edge of the paper cutter. (Fig. 5)
Paper holder
Printer cover Fig. 1
3 cm - 5 cm (1-3/16 to 1-31/32 )
Fig. 1
Ink ribbon
Fig. 2
Fig. 2 Fig. 3
Reel Reel shaft Ink ribbon
Fig. 4 Fig. 3
Paper cutter
Fig. 5
DO NOT PULL THE PAPER BACKWARDS AS THIS MAY DAMAGE THE PRINTER MECHANISM.
CS-2640 Ink ribbon replacement
�3�
 $4.99 CS2640 SHARP
Owner's Manual Complete owner's manual in digital format. The manual will be available for download as PDF file aft…
|
|
|
> |
|