|
|
|
Categories
|
|
Information
|
|
Featured Product
|
|
|
 |
|
|
There are currently no product reviews.
 ;
Finding the owners manual for my Pioneer CRWM62R is greatly appreciated. I had searched several other web sites with no success. Although my manual was not listed on your site for immediate download, I recevied an email within a few hours that my ower's manual was posted for me. I had no difficulty downloading the manual for my 20 year old multi-cassette player. Owner Manuals provides a service that is valuable, easy-to-use, accurate , efficient, and priced fairly. I thank you.
;
Excellent manual - just what I needed. Although currently available only in German, their are lots of pictures which makes it all very clear.
;
PHILIPS PE1642 Owner's Manual
Hi,
you have complet fullfilled my expectance.
Price is OK.
Robert Schmid
 ;
Came in the mail within a few hours. Gave clear instruktion on maintaines. Is of great use to have this manual in house
;
Easy to access. Clear instructions. No problems. Printed fine.
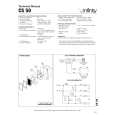
EXISTING CONSTRUCTION
CS 50, CS 60 CS 60R, CS 60RDT, CS 80R
Template
1. Remove the grille from the speaker frame.
2. Determine the correct speaker location. NOTE: Remove the inner template, which is the paint shield, at the perforation. Use the outer template when cutting the drywall.
1. Remove the grille from the speaker frame.
2. Determine the correct speaker location. NOTE: Remove the inner template, which is the paint shield, at the perforation. Use the outer template when cutting the drywall.
�1/2" �1/2" �1/2" �1/2" �1/2" �1/2"
3. NOTE: Always allow at least one-half inch between a wall stud and the speaker cutout or the locking tabs will not be able to swivel into place.
4. Cut the drywall.
3. Determine the correct speaker location. NOTE: Always allow at least onehalf inch between a wall stud and the speaker cutout, or the locking tabs will not be able to swivel into place.
4. Cut the drywall.
5. Connect the speaker wires to the speaker.
6. Place the speaker assembly in the wall.
5. Connect the speaker wires to 6. Place the frame the speaker. Model CS 60RDT assembly in the wall. requires two sets of speaker wires, one for each channel.
7. Screw down each of the 8. Replace the metal grille. Phillips head screws.The locking tabs will swivel into place and secure the unit to the rear surface of the drywall.
7. Screw down each of the four Phillips head screws.The locking tabs will swivel into place and secure the unit to the rear surface of the drywall.
8. Replace the metal grille.
6
CS SERIES
|
|
|
> |
|