|
|
|
Categories
|
|
Information
|
|
Featured Product
|
|
|
 |
|
|
There are currently no product reviews.
 ;
Very well done!!!!! congratulations. It was a bit longer than usual the wiating time even if it was on time (in 24 hours).
;
Last week I bought a second hand BAUKNECHT TRK4850 DRYER. It is a professional machine with many programs and switch options. I feared it would be a huge quest to find a manual. I was delighted when I found owner-manuals.com. After payment I received the file to download the next day already. The quality is great. I am very happy. Thanks!
but kindly the distributions of the operating programs not find in the owners manual,can you help me to understand the operating programs instructions thank you
;
Very good copy, very readable and easy transaction as always.
;
It is perfect, exactly what we needed. It's like the paper version but less clutter.
 ;
Received my manual within 24 hours. Very clear scan of the manual I needed. Thanks!
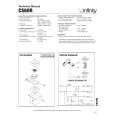
EXISTING CONSTRUCTION
CS 50, CS 60 CS 60R, CS 60RDT, CS 80R
Template
1. Remove the grille from the speaker frame.
2. Determine the correct speaker location. NOTE: Remove the inner template, which is the paint shield, at the perforation. Use the outer template when cutting the drywall.
1. Remove the grille from the speaker frame.
2. Determine the correct speaker location. NOTE: Remove the inner template, which is the paint shield, at the perforation. Use the outer template when cutting the drywall.
�1/2" �1/2" �1/2" �1/2" �1/2" �1/2"
3. NOTE: Always allow at least one-half inch between a wall stud and the speaker cutout or the locking tabs will not be able to swivel into place.
4. Cut the drywall.
3. Determine the correct speaker location. NOTE: Always allow at least onehalf inch between a wall stud and the speaker cutout, or the locking tabs will not be able to swivel into place.
4. Cut the drywall.
5. Connect the speaker wires to the speaker.
6. Place the speaker assembly in the wall.
5. Connect the speaker wires to 6. Place the frame the speaker. Model CS 60RDT assembly in the wall. requires two sets of speaker wires, one for each channel.
7. Screw down each of the 8. Replace the metal grille. Phillips head screws.The locking tabs will swivel into place and secure the unit to the rear surface of the drywall.
7. Screw down each of the four Phillips head screws.The locking tabs will swivel into place and secure the unit to the rear surface of the drywall.
8. Replace the metal grille.
6
CS SERIES
|
|
|
> |
|