|
|
|
Categories
|
|
Information
|
|
Featured Product
|
|
|
 |
|
|
There are currently no product reviews.
 ;
So usefull to make my installation a breeze. 5 stars on quality.
;
very helpful, the information in these manuels are very detailed
;
Please tell us what you think and share your opinions with others. Be sure to focus your comments on the product. You will receive $2.00 of store credit for Your review.
;
Please tell us what you think and share your opinions with others. Be sure to focus your comments on the product. You will receive $2.00 of store credit for Your review.
;
Good copy and great customer service! There was some confusion with my order and it was resolved promptly!
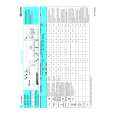
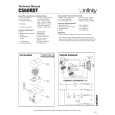
EXISTING CONSTRUCTION
CS 50, CS 60 CS 60R, CS 60RDT, CS 80R
Template
1. Remove the grille from the speaker frame.
2. Determine the correct speaker location. NOTE: Remove the inner template, which is the paint shield, at the perforation. Use the outer template when cutting the drywall.
1. Remove the grille from the speaker frame.
2. Determine the correct speaker location. NOTE: Remove the inner template, which is the paint shield, at the perforation. Use the outer template when cutting the drywall.
�1/2" �1/2" �1/2" �1/2" �1/2" �1/2"
3. NOTE: Always allow at least one-half inch between a wall stud and the speaker cutout or the locking tabs will not be able to swivel into place.
4. Cut the drywall.
3. Determine the correct speaker location. NOTE: Always allow at least onehalf inch between a wall stud and the speaker cutout, or the locking tabs will not be able to swivel into place.
4. Cut the drywall.
5. Connect the speaker wires to the speaker.
6. Place the speaker assembly in the wall.
5. Connect the speaker wires to 6. Place the frame the speaker. Model CS 60RDT assembly in the wall. requires two sets of speaker wires, one for each channel.
7. Screw down each of the 8. Replace the metal grille. Phillips head screws.The locking tabs will swivel into place and secure the unit to the rear surface of the drywall.
7. Screw down each of the four Phillips head screws.The locking tabs will swivel into place and secure the unit to the rear surface of the drywall.
8. Replace the metal grille.
6
CS SERIES
|
|
|
> |
|