|
|
|
Categories
|
|
Information
|
|
Featured Product
|
|
|
 |
|
|
There are currently no product reviews.
 ;
Good quality instructions manual. Very useful to me. Quick and excellent service from Owner-Manuals... Thanks !!!
;
Sono molto soddisfatto e, quando mi necessiterà, mi avvarrò nuovamente di questo servizio!
;
A comprehensive Operating and Service Manual. All schematics are complete and easy to read. The PCB drawings and complete parts list are very helpful. I would definitely recommend this manual.
;
SCANNING OF HIGH QUALITY
VERY, VERY HIGH VELOCITY DOWNLOAD
VERY GOOD PRICE,
TRUE SATISFIED, THANKS
;
Genuine Toshiba owner's manual. Couldn't really ask for more. And written in understandable English in contrast to a few recent experiences I have had with manuals for other equipment other than Toshiba but made in China and written in "Chinglish"!
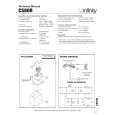
EXISTING CONSTRUCTION
CS 50, CS 60 CS 60R, CS 60RDT, CS 80R
Template
1. Remove the grille from the speaker frame.
2. Determine the correct speaker location. NOTE: Remove the inner template, which is the paint shield, at the perforation. Use the outer template when cutting the drywall.
1. Remove the grille from the speaker frame.
2. Determine the correct speaker location. NOTE: Remove the inner template, which is the paint shield, at the perforation. Use the outer template when cutting the drywall.
�1/2" �1/2" �1/2" �1/2" �1/2" �1/2"
3. NOTE: Always allow at least one-half inch between a wall stud and the speaker cutout or the locking tabs will not be able to swivel into place.
4. Cut the drywall.
3. Determine the correct speaker location. NOTE: Always allow at least onehalf inch between a wall stud and the speaker cutout, or the locking tabs will not be able to swivel into place.
4. Cut the drywall.
5. Connect the speaker wires to the speaker.
6. Place the speaker assembly in the wall.
5. Connect the speaker wires to 6. Place the frame the speaker. Model CS 60RDT assembly in the wall. requires two sets of speaker wires, one for each channel.
7. Screw down each of the 8. Replace the metal grille. Phillips head screws.The locking tabs will swivel into place and secure the unit to the rear surface of the drywall.
7. Screw down each of the four Phillips head screws.The locking tabs will swivel into place and secure the unit to the rear surface of the drywall.
8. Replace the metal grille.
6
CS SERIES
|
|
|
> |
|