|
|
|
Categories
|
|
Information
|
|
Featured Product
|
|
|
 |
|
|
There are currently no product reviews.
 ;
The manual was exactly what I wanted and I found it nowhere else. Thanks!
;
Having purchased a 1994 Kenwood music system from a Charity shop in 2013 (it was a high end product in its day), I found myself not quite knowing where to plug in what, and how to do this, that and the next thing. I needed a Manual, and after failure with another online 'Manual provider' I found Owner Manuals dot com. Well, I wasn't sure, but it was only $5, and if things didn't work out, I wouldn't have lost much...
But things DID work out. After paying my childrens inheritance money, $4.99, I was sent a Manual for my Kenwood System very quickly. Alas, it was in German, and being Scottish, I could not read it or get my system in order from it...a rapid email to them brought the English Manual in short order, and my retro-system was and IS up and running in it's regulation settings.
I am very grateful to http://www.owner-manuals.com for their quick service and for even having such an obsolete Manual in the first place! If you need a Manual for ANYTHING, try here first. I wouldn't be surprised if I bought a 1928 Marconi radio, and got the user Manual for THAT here too!
Top marks.
John Copeland
Glasgow
Scotland
;
I was so happy that the owner's manual was available. It is well written and helped me to use the radio/CD player/recorder without problems. Thanks for making it available.
Irene Lambert
;
Excellant!!! Very quick and easy....Best $4.99 I have spent in a very long time..
I highly recommend this.
;
Thanks so much for the Owner's manual for my Sony PS - FL1. I had purchased the turntable off of eBay. It came in and looked great. Packed well and appeared to be great. I balanced and aligned the tone are and hooked it up. When trying to play a record the tone are would move to the right place and just before it would drop to play it moved back off the edge of the record before touching down. I searched the net for an answer to this issue. No luck. Then I purchased the owners manual and sure enough there was a place to adjust where the stylus touched down. That adjustment solved the problem and saved me a $35 feet to have the player checked out. The manual is well written and easy to understand. It is a must have for anyone with this front loading Sony turntable.
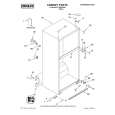
DOOR FEATURES
Your model may have some or all of these features. Features that can be purchased separately as product accessories are labeled with the word �Accessory.� Not all accessories will fit all models. If you are interested in purchasing one of the accessories, please call the toll-free number on the cover or in the "Assistance or Service" section.
Adjustable Utility Compartment & Tray
(on some models)
The utility compartment and tray slide from one side to the other for more flexible storage. The tray fits on either side of the utility compartment or partially underneath it. Try moving it to different positions to find the option that works best for you. To install and adjust the utility compartment and tray: 1. Insert the front of the utility tray into the slot on the back of the shelf rail. Lower the back of the tray into position. 2. Place the front of the utility compartment on top of the shelf rail. Lower the back of the compartment onto the ribs on the refrigerator door.
Door Rails
The door rails may be removed for easier cleaning.
Snap-on Door Rails
To remove and replace the rails: 1. Remove the rails by pushing in slightly on the front of the bracket while pulling out on the inside tab. Repeat these steps for the other end of the rail. 2. Replace the rails by aligning the ends of the brackets with the buttons on the sides of the door liner. Firmly snap bracket and rail assembly onto the tabs above the shelf as shown.
3. Adjust the utility compartment by lifting the front slightly and sliding it to the desired position. Lower the front to lock it into place.
Drop-in Door Rails
To remove and replace the rails: 1. Remove the rails by pulling straight up on each end of the rail. 2. Replace the rails by sliding the shelf rail into the slots on the door and pushing the rail straight down until it stops.
Flip-up Door Shelf
(on some models)
The shelf bottom flips up so you can store taller items in the door shelf below. When in the down position, the shelf is strong enough to hold up to 10 lbs. (4.5 kg).
Can Racks and Door Bins
(on some models)
NOTE: Can racks may be purchased as an Accessory for some models. To remove and replace the racks/bins: 1. Remove the rack/bin by lifting it and pulling it straight out. 2. Replace the rack/bin by sliding it in above the desired support and pushing it down until it stops.
14
|
|
|
> |
|