|
|
|
Categories
|
|
Information
|
|
Featured Product
|
|
|
 |
|
|
There are currently no product reviews.
 ;
A comprehensive Operating and Service Manual. All schematics are complete and easy to read. The PCB drawings and complete parts list are very helpful. I would definitely recommend this manual.
;
SCANNING OF HIGH QUALITY
VERY, VERY HIGH VELOCITY DOWNLOAD
VERY GOOD PRICE,
TRUE SATISFIED, THANKS
;
Genuine Toshiba owner's manual. Couldn't really ask for more. And written in understandable English in contrast to a few recent experiences I have had with manuals for other equipment other than Toshiba but made in China and written in "Chinglish"!
;
I purchased a vintage Sony mixer off eBay and within the hour was able to locate and purchase the manual for it.I mean really,where else can you find a manual for a product made in 1983!? It was easy to find and purchase/download the manual I needed.I will use this site again for other equipment I have! Great site!
;
manual de usuario perfecto y completo de buena calidad de impresion y muy detallado ideal !
Wall Oven
Cleaning
Chart
(continued)
Never
use oven cleaner
on a self-clean
oven.
Do not dean
or rub door gasket.
Wipe up acid spills (lemon, tomato or milk based {oods) as soon as oven is cool with soap and water. If the spill is not wiped up, it may diseolor the poreel_dn. To remove oeeasionaI spillovers between eleanings, soap-filled seouriug pad or mild eleanser; use a
rinse well.
MAINTENANCE
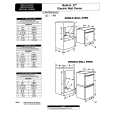
Light Replacement Adjusting Oven Temperature
Before replacing huIb, disconnect power to oven at the main fuse or circuit breaker panel. Be sure that the entire oven earl)" including the light bulb is cool before attempting to remove. To Replace Light Bulb The oven temperature can he adjusted if all oven temperatures are too low or too high and the length of time to cook ALL foods is too long or too short. Do NOT adjust the teinperature if only one or two items are not baking properly. NOTE: Temperature adjustment lower o_en of a double wall oven. TO Adjust 1. Press the BAKE pad. '2. Press and hoht the � appears in the display. pad until 500 ° or higher not possihIe on
l. Carefully unscrew the glass light lens. 2. To obtain firm grasp on the bulb, wear protective rubber gloves. Remove by turning bulb to the left. Do not touch a hot oven light bulb with a damp cloth as bulb will break. NOTE: If the bulh does break and you _4sh to remove it, be certain power snpply is disconnected and wear protective gloves. You inay contact a qualil3ed Maytag Serxqcer. 3. Replace bulb with a 40 watt oven-rated appliance bulb. Bulb with hrass base is recommended to prevent fusing ofbulh into socket, 4. Replace bulb cover and reconnect Reset clock. power to oven.
3 Press and hokt the BAKE pad fi_r six seconds nnti] 00 appears m the dlspla?. 4. Press the � or � pad(s) to enter the desired ott_et temperature. 35 to +35°.) Four seconds (Allowable range is will ° return to later, the display current time of dav. NOTE: Do not change the temperature than 10° hefure checking the oven. setting more
To check, we recommend baking two 9" yellow layer cakes using a purchased box mix. If the oven temperature is still too low or too high repeat the procedure described ahove.
PAGE 12
|
|
|
> |
|