|
|
|
Categories
|
|
Information
|
|
Featured Product
|
|
|
 |
|
|
There are currently no product reviews.
 ;
Came in the mail within a few hours. Gave clear instruktion on maintaines. Is of great use to have this manual in house
 ;
Easy to access. Clear instructions. No problems. Printed fine.
;
Great scan but please note that it is entirely in GERMAN.
;
High quality scan of the manual, very quick and easy download and very important, a truly honest price. thanks
;
Minden rendben, de két megjegyzés, az ábrák nehezen kivehetők és a fizetés után 24 órát kell várni a letöltésre.
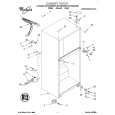
Cabinet Installation
1. Open the window. Mark a line on center of the window sill(or desired air conditioner location). Carefully place the cabinet on the window sill and align the center mark on the bottom front with the center line marked in the window sill. (See Fig. 1)
Window Sash
Upper Guide Window sill Fig. Front Angle
1
Upper guide
2. Pull the bottom window sash down behind the upper guide until it meets. (See Fig. 2) NOTE: � Do not pull the window sash down so tightly that the movement of Frame Curtain is restricted. 3. Loosely assemble the sill support using the parts in Fig. 3. 4. Select the position that will place the sill support near the outer most point on sill (See Fig. 4)
Foam-pe 10 Cabinet Frame Curtain
1
Fig. 2
INDOOR OUTDOOR
Sill Support Bolt
3 2
Nut
4
Fig. 3
5
Screw (Type A)
5. Attach the sill support to the cabinet track hole in relation to the selected position using 2 Type A screws in
Cabinet INDOOR
Screw (Type B)
6
OUTDOOR Fig. 4 /2"(12.7 About /2" (12.7 mm)
Sill support
2
1
Features and Installation
each support (See Fig. 4). 6. The cabinet should be installed with a very slight tilt (about 1/2"(12.7 mm)) downward toward the outside (See Fig. 5). Adjust the bolt and the nut of sill support for balancing the cabinet. 7. Attach the cabinet to the window sill by driving the screws (Type B) through the front angle into window sill. 8. Pull each Frame curtain fully to each window sash track, and repeat step 2.
Sill support
2
Sash track
Front Angle
Screw (Type B)
6
Fig. 5
12
1
|
|
|
> |
|