|
|
|
Categories
|
|
Information
|
|
Featured Product
|
|
|
 |
|
|
There are currently no product reviews.
 ;
Exactly as advertized. High quality digital copy of the Nak 610 user manual. Easy download and access. Highly recommended.
;
The manual was exactly what I wanted and I found it nowhere else. Thanks!
;
Having purchased a 1994 Kenwood music system from a Charity shop in 2013 (it was a high end product in its day), I found myself not quite knowing where to plug in what, and how to do this, that and the next thing. I needed a Manual, and after failure with another online 'Manual provider' I found Owner Manuals dot com. Well, I wasn't sure, but it was only $5, and if things didn't work out, I wouldn't have lost much...
But things DID work out. After paying my childrens inheritance money, $4.99, I was sent a Manual for my Kenwood System very quickly. Alas, it was in German, and being Scottish, I could not read it or get my system in order from it...a rapid email to them brought the English Manual in short order, and my retro-system was and IS up and running in it's regulation settings.
I am very grateful to http://www.owner-manuals.com for their quick service and for even having such an obsolete Manual in the first place! If you need a Manual for ANYTHING, try here first. I wouldn't be surprised if I bought a 1928 Marconi radio, and got the user Manual for THAT here too!
Top marks.
John Copeland
Glasgow
Scotland
;
I was so happy that the owner's manual was available. It is well written and helped me to use the radio/CD player/recorder without problems. Thanks for making it available.
Irene Lambert
;
Excellant!!! Very quick and easy....Best $4.99 I have spent in a very long time..
I highly recommend this.
Care and Maintenance
TURN THE AIR CONDITIONER OFF AND REMOVE THE PLUG FROM THE POWER OUTLET.
Air Filter Cleaning
The air filter behind the front grille should be checked and cleaned at least once every 2 weeks or more often if necessary.
TO REMOVE:
1. Open the inlet grille upward by pulling out the bottom of the inlet grille or downward by pulling out the top of the inlet grille. 2. Using the tab, pull up slightly on the filter to release it and pull it down or up. 3. Clean the filter with warm, soapy water below 40°C (104°F). 4. Rinse and gently shake the water from the filter and let it dry before replacing it.
About Controls on the Air Conditioner
CAUTION: DO NOT operate the air conditioner without a filter because dirt and lint will clog it and reduce performance.
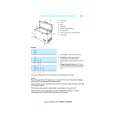
How to insert batteries
1. Remove the cover from the back of
the remote controller. � Do not use rechargeable batteries. Such batteries differ from standard dry cells in shape, dimensions, and performance. � Remove the batteries from the remote controller if the air conditioner is not going to be used for an extended length of time. � Keep the remote control away from infants and small children to prevent them from accidentally swallowing the batteries.
2. Insert two AAA dry cell batteries.
� Be sure that the (+) and (-) directions are correct. � Be sure that both batteries are new.
3. Re-attach the cover.
8
|
|
|
> |
|