|
|
|
Categories
|
|
Information
|
|
Featured Product
|
|
|
 |
|
|
There are currently no product reviews.
 ;
We received the manual in a timely manner and it was exactly what we were expecting. Excellent replacement for original Service Manual.
All schematics are very legible. We are really satisfied.
;
We received the manual in a timely manner and it was exactly what we were expecting. Excellent replacement for original Service Manual.
All schematics are very legible. We are really satisfied.
;
We received the manual in a timely manner and it was exactly what we were expecting. Excellent replacement for original Service Manual.
All schematics are very legible. We are really satisfied.
;
We received the manual in a timely manner and it was exactly what we were expecting. Excellent replacement for original Service Manual.
All schematics are very legible. We are really satisfied.
;
Fast delivery and good quality manual.
Very easily downloadable from a given url.
Will be pleased to buy again from this seller.
D
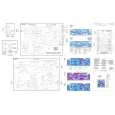
Demontage
GB
Disassembly
Demontageschritte Disassembly steps
Entfernen, entriegeln, abziehen Remove, unlock, disconnect
Bemerkungen Remarks
Fig. Fig.
Frontblende (F), Front Panel (F)
Release Panel Release Panel
abnehmen remove
Schrauben (2xE) Screws (2xE)
abschrauben unscrew
1
Feder (2xD) Spring (2xD)
entfernen remove
1
Rahmen (B) Frame (B)
Rahmen vorsichtig abziehen. Carefully remove the Frame.
1+2
Schrauben (4xG) Screws (4xG)
abschrauben unscrew
2
Frontblende (F) Front panel (F)
Frontblende vorsichtig abziehen. Carefully remove the front panel.
Laufwerk (C), Mechanism (C) (ADC 1400 + TN 705)
Schrauben (4xA) Screws (4xA)
abschrauben unscrew
3
X 1110 + X 1302 X 1110 + X 1302
vorsichtig abziehen carefully unplug
3
Laufwerk (C) Mechanism (C)
Laufwerk vorsichtig nach oben abheben. Carefully lift out the mechanism.
3
Laufwerk (K), Mechanism (K) (TN 708)
Schrauben (4xA) Screws (4xA)
abschrauben unscrew
4
Laufwerk (K) Mechanism (K)
Laufwerk vorsichtig nach oben abheben. Carefully lift out the mechanism.
4
X 1301 X 1301
vorsichtig abziehen carefully unplug
5
-6-
|
|
|
> |
|