|
|
|
Categories
|
|
Information
|
|
Featured Product
|
|
|
 |
|
|
There are currently no product reviews.
 ;
Great Manual. This manual is available no where else. It was exactly what I was looking for. Only in German.
 ;
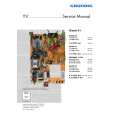
This GRUNDIG UV5A Owner Manual is not only an instruction manual but a total functional circuit description of the Multimeter and includes circuit diagram at the end pages. It is very helpful for repairing and calibrating the instrument. It is written in two languages English and German for international support. It was very easy to repair my unit with this document. Regards, Regis Pauly, Electrical Engineer.
;
The owner's manual was evetything I thought it would be. I was able to print it out using both sides of the paper in quick order, saving me a search online for a used one.
;
Хорошее качество сканирования.
Мануал пришел часов эдак через 12. В целом доволен.
;
Fantastic quality and impressive delivery time. Based on this manual, I recommend this service without hesitation! Five Stars for certain.
���������� �����������
SETTINGS
___________________________________________________________________________________
Sorting TV channels
1 In the » SORT« menu, select the TV channel to be moved with »,« or
SORT �����������������
P 01 P 02 P 03 P 04 P 05 P 06 P 07 P 08 P 09 P 10 ARD ZDF RTL SAT1 PRO7 BR 3
».«.
2 Mark the TV channel with »OK«. 3 Select a new channel position with »,« or ».«. 4 Save the setting with »OK«.
Note: To sort further TV channels, repeat points 1 to 4.
OK Sort AUX Delete Return TXT TV
Completing the settings
1 Complete the settings with »TXT«.
Picture settings
Setting brightness, colour, contrast, definition and tint
1 Call up the » PICTURE« menu with »z«.
� The » PICTURE« menu appears.
PICTURE
Brightness Color Contrast Sharpness Perfect Clear
IIIIIIIII� IIIIIII� IIIIIII� IIIIIII�
on
_____ �� _____ ���� _____ ���� ����n
TXT
2 Select the line »Brightness«, »Color«, »Contrast«, »Sharpness« or »Tint«
(color tone) with »,« or ».« and set the required value with »F« or »E« (»Tint« indication only for NTSC reception). Note: The set has been tested with maximum contrast in order to control the reliability of all modules. Depending on the location of the set and the light level in the room (ambient light) it is nevertheless a good idea to reduce the contrast slightly for optimum picture quality.
3 Complete the setting with » TXT«.
Perfect Clear
Perfect Clear increases contrast in dark areas of the picture. This gives the picture depth.
1 Call up the » PICTURE« menu with »z«.
PICTURE
Brigthness Color Contrast Sharpness Perfect Clear
IIIIIIIII� IIIIIII� IIIIIII�
� The » PICTURE« menu appears. ___ �� _____ ���� _____ ���� _____ IIIIIII�����n
on
2 Select the line »Perfect Clear« with »,« or ».« and switch the function
on or off with »F« or »E«.
TXT
3 Complete the setting with » TXT«.
ENGLISH 7
|
|
|
> |
|