|
|
|
Categories
|
|
Information
|
|
Featured Product
|
|
|
 |
|
|
There are currently no product reviews.
 ;
Excellent manual, complete, great resolution, easy to read especially the schematics. Thank you !
;
Fast delivery, excellent resolution and complete. And above all, the best price ever !
;
Vielen Dank,
das war eine prima Sache. Habe das Serviceheft nach 3 Stunden herunterladen können. Qualität OK. Hat mir mit Erfolg bei der Fehlersuche und Reparatur meines
Nordmende Galaxy Mesa 9000 geholfen. Ich kann diesen Service bestens weiterempfehlen
A very good service.
Thank You!
;
everything i needed. it was easy to get. and this site is now my go to site for manuals.
 ;
Quality as promised it arrived fast. No problems what so ever
DBR-T200GB
7.1.2 Self-Diagnosis Mode
Procedure
1) Open the bonnet and short the Boot Pin (K6003) and GND. (The Boot Pin terminal is located at the upper side of CN6001 as seen from the front.) 2) Turn ON the power. Push "SELECT" key. The self-diagnosis mode is set. LED �0 to 38� on the IRD front panel light up one by one and then all lit. If a LED stops between �0 and 38�, the circuit block corresponding to that number should be checked. 3) When all the LEDs are lit, it indicates that the IRD is waiting for downloading of the Test software "Ggs1001.exe". The Test software "Ggs1001.exe" will be downloaded from the PCMCIA CARD JIG (GGF1377) connected to the IRD. 4) When the downloading completes normally, OK is displayed on the PC display. If OK, it indicates that the Download JIG is operating normally. 5) After completing the downloading, resetting the power supply, and this time all LEDs �0 to 38� will light up one by one, and finally all lit. If a LED stops, the circuit block corresponding to that number should be checked.
Example Downloading of Self-Diagnosis Program
1) Move the cursor to �No.8 PCMCIA ON� at MAKE CHECK_STEP, press the RETURN key ,then move the cursor to "No.25 PCMCIA Download" also at MAKE CHECK_STEP , press the RETURN key and then press the F10 key to end the setting. When the IRD side sets into the downloading standby state, select IRD CHECK from the main menu, and press the RETURN key. Then the IRD CHECK screen is displayed. Press the RETURN key again ,then supply the power to the JIG and "OK" is displayed if there is no problem. Press the RETURN key once more to download the program. Note : If the PCMCIA CARD JIG is not inserted or the CARD JIG part is something wrong ,"NG" is displayed.
2)
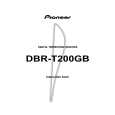
MAIN ASSY
Rear side
CN4001 CN5004
IC2001 DL Pin (K2002) STi5511M Boot Pin (K6003)
CN5005
CN6002
Front side
Fig.1 Pin LOCATION
37
|
|
|
> |
|