|
|
|
Categories
|
|
Information
|
|
Featured Product
|
|
|
 |
|
|
There are currently no product reviews.
 ;
The only reason I gave this less than 4 stars, is because it shouldn't take 24 hrs to have the download available. I was surprised to find that I had to wait until the next day to be able to download the manual that I paid for.
The manual itself is the correct manual.
 ;
Excellent replacement for original Owner´s Manual. I am totally satisfied!
;
Great service. Manual is as advertised and delivered when promised.
;
Perfect quality, highly appreciated service !!!
Fast delivery of the download info, no issues at all. Recommended E-manual shop !!!
;
hi owners manual- crew,
i am very satisfied about the trade with you.
if i need some other manuals, i will contact you again.
thanks
frank kappler
E8GA5BD(EN).fm Page 15 Tuesday, April 17, 2007 11:56 AM
If you want to use the unit during a Timer Recording or while the indicator is on or flashing.
� Press STANDBY-ON to turn on the unit. Press DVD on the remote control to choose DVD mode, then continue with the other DVD features as described in this manual. You don�t need to set the TIMER off to use the unit.
Note (for Timer Recording) :
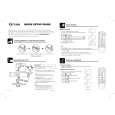
� If there is a power failure or the unit is unplugged for more than 30 seconds, clock and all timer settings will be lost. Copying a Video Tape You can make copies of videotapes made by friends or relatives for your own enjoyment. Connect the recording DVD/VCR (this unit), playing VCR (another VCR) and your TV as outline in the following diagrams. Using scart jacks
Playing VCR
1) Insert a pre-recorded videocassette into the playing VCR. 2) Insert video cassette tape with its erase-prevention tab in place into the cassette compartment of the recording unit. 3) Press SPEED/SYSTEM to select the desired recording speed (SP/LP). 4) Select �AV2� or �AV3� position on the recording unit. See �External Input Mode (for VCR Features)�. (Refer to page 9.) 5) Press REC/OTR on the recording unit. 6) Begin playback of the tape in the playing VCR. 7) To stop recording, press STOP/EJECT on the recording unit, then stop playback of the tape in the playing VCR.
Note: �
For best results during dubbing, use the unit�s front panel controls whenever possible. The remote control might affect the playing VCR�s operation. � If video or colour fades in and out, you may be copying a copy guarded video tape. � Unauthorised recording of copyrighted materials may infringe on the rights of copyright owners, violate copyright laws and may not record clearly.
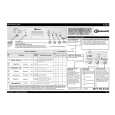
Status Display
to 21-Pin Scart jack Recording DVD/VCR (this unit)
DVD
DIGITAL AUDIO OUT ANALOG AUDIO OUT S-VIDEO OUT
To check the Counter, or Clock & Channel number, press DISPLAY. Each time you press DISPLAY, TV screen will change as illustrated: When you select the channel using the Number buttons, select the desired channel (position number).
AERIAL RF OUT
L
COAXIAL
VCR
DVD/VCR
AV2 (DECODER) AV1 (TV)
R
<OFF mode>
<COUNTER mode>
â� SP
<CLOCK and CHANNEL NUMBER mode>
â� SP 17:40 P02
Press once.
0:12:34
Press once.
to 21-Pin Scart jack
Press once.
(TV)
Note: �
Using AV front terminals
Playing VCR to the video output jack
If the on-screen display shows an abnormal reading or no reading, unplug this unit for 30 seconds, then plug it in again. Please note that clock and timer settings will be cleared after disconnection.
Real Time Tape Counter � This counter shows the elapsed recording or playback time in hours, minutes, and seconds on screen. (Nothing is shown in the case of blank portion.) � The � � � indication will appear when the tape is rewound further than the tape counter position �0:00:00�. Automatic Operations
PLAY SKIP FWD
to the audio output jack Recording DVD/VCR (this unit)
OPEN/CLOSE
PAL
OUTPUT
STANDBY-ON
VIDEO
AUDIO
REW F.FWD STOP/EJECT PLAY REC/OTR
VCR CHANNEL
DVD DISC IN
SKIP STOP
REV
Automatic Rewind, Eject
to AV1 (TV) Scart jack on the back of the DVD/VCR to 21-Pin Scart jack (TV)
When the end of a tape is reached during recording, playback or fast-forward, the tape will be automatically rewound to the beginning. After that, the unit will eject the tape. � The unit will not rewind the tape automatically during Timer Recording or One Touch Recording.
Tape Eject
A tape can be ejected with the unit power on or off (but the unit must be plugged in). � If a Timer Recording is set, press STOP/EJECT twice to eject a tape.
15
EN
|
|
|
> |
|