|
|
|
Categories
|
|
Information
|
|
Featured Product
|
|
|
 |
|
|
There are currently no product reviews.
 ;
Nothing wrong with the manual or the delivery - came to me the same day I ordered it. But afterwards I realized that I ordered the wrong manual. Probably better with the Quick start - version. So maybe it would be better if we could see a list with inhold for each manual before ordering?
 ;
Bought T4850 High End Tuner a few years ago, but i didn't know where all the buttons were used for. So i purchased the owners manual. Perfect! Just what i needed.
;
Bought the used Philips car-radio. No manual! Found on this site a copy of the orginal English manual. I am very happy with it. Now I know how to setup and use my "new" car-radio.
Recommended site for everybody looking for a manual for (older) products!
;
Great deal, you are the only one on earth who could deliver this old manual. Thx so much and have nice chrismas
;
Everything is OK. Owner's Manual I downloaded ( I get link for it by email).
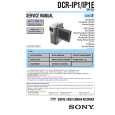
Step 3: Turning the power on
You need to slide the POWER switch repeatedly to select the desired mode to record or play. When using this camcorder for the first time, the CLOCK SET screen appears (p. 17).
Step 4: Adjusting the LCD panel
You can adjust the angle and brightness of the LCD panel to meet various recording situations.
Even when there are obstructions between you and the subject, you can check the subject on the LCD screen during recording by adjusting the angle of the LCD panel.
Maximum 180 degrees
While pressing the green button, slide the POWER switch in the direction of the arrow.
The power turns on. To enter the recording or playing mode, slide the switch repeatedly until the respective lamp for the desired power mode lights up. When the POWER switch is set to the CAMERA-TAPE or CAMERA-MEM mode, the lens cover opens.
Maximum 90 degrees LCD BACKLIGHT
Open the LCD panel 90 degrees to the camcorder, then rotate it to the desired position.
To adjust the brightness of the LCD screen
� CAMERA-TAPE mode: To record on a tape. � CAMERA-MEM mode: To record on a �Memory Stick Duo.� � PLAY/EDIT mode: To play or edit pictures on a tape or �Memory Stick Duo.�
1 Touch . 2 Touch LCD BRIGHT.
If the item is not displayed on the screen, touch / . If you cannot find it, touch MENU, select the (STANDARD SET) menu, then touch LCD SET.
To turn off the power
Slide the POWER switch up to (CHG)OFF. The lens cover closes.
3 Adjust the item with
touch .
/
, then
z Tips � The recorded pictures will not be affected by this adjustment. � If you rotate the LCD panel 180 degrees to the lens side, you can close the LCD panel with the LCD screen facing out. � If you are using the battery pack for power source, you can adjust the brightness by selecting [LCD SET], then [LCD BL LEVEL] on the (STANDARD SET) menu (p. 67).
16
Getting started
 $4.99 DCRIP1 SONY
Service Manual Complete service manual in digital format (PDF File). Service manuals usually contains circuit diagr…
|
|
|
> |
|