|
|
|
Categories
|
|
Information
|
|
Featured Product
|
|
|
 |
|
|
There are currently no product reviews.
 ;
Great PDF easy to read good info needed for replacment of belts and assembly and specs.
;
complete and unabridged very good quality
easy to download.
recieved in two days.
;
Awesome manual. Complete diagrams of all board assemblies as well as how to get to each part of the t.v. down to the individual screws and their locations. Get it.
;
perfect copy, im very satisfied, i was need the diagram over the powersupply and
the copy was very sharp
;
This is exactly the service manual I needed.
Complete with all schematics, partslists, PCB layouts and alignment instructions.
This manual covers both the T-4970 en T-488F Onkyo tuner.
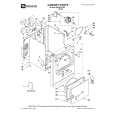
DV MECHANICAL ADJUSTMENT MANUAL VII
3-31.EJ Arm
1.
1) 2) 3)
Removal procedure
Remove the hook 1 of the tension coil spring (EJ arm) 3 that is hooked on the round hole A. Remove the EJ arm and the tension coil spring (EJ arm) 2 all together in the direction of the arrow. Remove the tension coil spring (EJ arm) 3 from the EJ arm 4.
2.
1) 2)
Attachment procedure
Install the tension coil spring (EJ arm) 3 into the round hole of the EJ arm 4 with the hook facing upward. Insert the top tip (bent) portion B of the EJ arm 4 into the groove of the mechanical chassis. Insert the dowel C into the round hole of the EJ arm. Insert he tension coil spring 1 into the round hole A of the mechanical chassis with the hook facing upward.
3)
2 EJ arm, Extension spring (EJ) 1 Remove the hook. B
The spring hook faces upward 3 Extension spring (EJ)
The spring hook faces upward
A 4 EJ arm
Groove of the mechanical chassis Dowel C
EJ arm
Points to be noted
� When installing the EJ arm, confirm the front side and rear side so that the correct side is selected. � Extension spring (EJ) must not have elongation and opening of hook. Extension spring (EJ)
� 42 �
|
|
|
> |
|