|
|
|
Categories
|
|
Information
|
|
Featured Product
|
|
|
 |
|
|
There are currently no product reviews.
 ;
Clear and complete service manual. Easy now to restore my old Kenwood KD-1500.
Thanks a lot.
;
Thanks for this "hard to find" service manual. This Sony PS212A is a very good turntable that needed to be restored !
 ;
Excellent quality on these manuals. Same as having the original printed manual and incredibly useful when doing a custom install like me. Keep it up on the good work.
;
This is an excellent information source. Great quality and tons of info regarding technical service for the Technics SH8065.
;
5 stars on this manual since it is the complete version, not the half manual you find free for download all over the web. Good job.
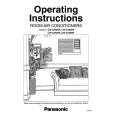
DV MECHANICAL ADJUSTMENT MANUAL VII
3-31.EJ Arm
1.
1) 2) 3)
Removal procedure
Remove the hook 1 of the tension coil spring (EJ arm) 3 that is hooked on the round hole A. Remove the EJ arm and the tension coil spring (EJ arm) 2 all together in the direction of the arrow. Remove the tension coil spring (EJ arm) 3 from the EJ arm 4.
2.
1) 2)
Attachment procedure
Install the tension coil spring (EJ arm) 3 into the round hole of the EJ arm 4 with the hook facing upward. Insert the top tip (bent) portion B of the EJ arm 4 into the groove of the mechanical chassis. Insert the dowel C into the round hole of the EJ arm. Insert he tension coil spring 1 into the round hole A of the mechanical chassis with the hook facing upward.
3)
2 EJ arm, Extension spring (EJ) 1 Remove the hook. B
The spring hook faces upward 3 Extension spring (EJ)
The spring hook faces upward
A 4 EJ arm
Groove of the mechanical chassis Dowel C
EJ arm
Points to be noted
� When installing the EJ arm, confirm the front side and rear side so that the correct side is selected. � Extension spring (EJ) must not have elongation and opening of hook. Extension spring (EJ)
� 42 �
|
|
|
> |
|