|
|
|
Categories
|
|
Information
|
|
Featured Product
|
|
|
 |
|
|
There are currently no product reviews.
 ;
El producto satisface las necesidades del servicio t
;
This is a good quality scan of the Operation & Maintenance (Service) Manual for the PAL version of this high-band broadcast umatic, BVU-800P
All schematics and lineup procedures appear to be included in this one manual AFAICT.
The file size is just over 113 MB which gives an idea of the quality and number of pages.
All of the schematics, which contain some fairly small print, are easily readable when you zoom into the page.
John Thompson, Newcastle Upon Tyne, England.
;
Good quality, all schematics of few of models. There is also short form of user manual and regulation manual.
;
Perfect copy of the service manual. you can enlarge every page, and it comes up
with all details.
;
It´s very very nice manual with all, what i need. Original in good quality. Very fast business. Very much thanks...
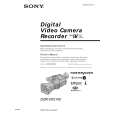
Recording a picture Adjusting the LCD screen
The LCD panel is opened up to 90 degrees and it rotates about 90 degrees to the viewfinder side and about 180 degrees to the lens side. If you turn the LCD panel over so that it faces the other way in standby or recording mode, the indicator appears on the LCD screen and in the viewfinder (Mirror mode).
180° 180
90°
OPEN To close the LCD panel, set it vertically and swing it into the camcorder body until it clicks. Note When you open the LCD panel, the viewfinder is automatically turned off, however, it is not turned off when the LCD panel is turned over or the camcorder is in mirror mode. When you adjust the angle of the LCD panel Make sure that the LCD panel is opened up to 90 degrees. When using both the LCD screen and the viewfinder during shooting The usable time of the battery pack when using both the LCD screen and the viewfinder will be shorter a little than when using the viewfinder only. Pictures in the mirror mode The picture on the LCD screen is a mirror-image. However, the recording picture will be normal. During recording in mirror mode ZERO SET MEMORY on the Remote Commander does not work. Indicators in the mirror mode The STBY indicator appears as zX and REC as z. Some of the other indicators appear mirror-reversed and others are not displayed. However, if you close the LCD panel with the LCD screen turned over, indicators appear normally.
18
|
|
|
> |
|