|
|
|
Categories
|
|
Information
|
|
Featured Product
|
|
|
 |
|
|
There are currently no product reviews.
 ;
perfect! you just sent to me the copy in Italian witout even my specification!!!! so you are really smart cooperative and efficient. To my opinion the best place all over to get a manual of electronics!!!!
;
Well Well Well!!!! Good manual perfect for my hobby!!! As Before you have done a very well done work!!!! Thank you
;
Super nice! Good to have a manual in digital format.
;
Great job supplying the manual.
Many of these products weerepretty obscure, so it was great that you had
the manual for it!
;
Great manual, would not have been able to operate my machine without it!!
James Dawson August 18, 2012
2
1.
Setting up your phone
Installing your DCTG 692/695
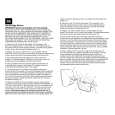
Connect the output plug of the base adapter to the adapter socket on the back of the base unit and the base adapter to the wall mains supply. A beep indicates that the phone is properly plugged (DCTG 695 only). Connect the telephone line cord to the phone socket on the back of the base unit and to the wall phone socket.
2.
3.
If you have bought a multi-pack product, each extra handset comes with a charger and a charger adapter. Connect the output plug of the charger adapter to the adapter socket on the bottom of the charger. Connect the charger adapter to the wall mains supply. Place 2 rechargeable NiMH AAA batteries (included), in correct polarities, into the battery compartment on the handset. Note: the warranty shall not apply to the batteries and any other components within lifetime and wear.
4.
5. 6.
Slide the battery door firmly into place. Place the handset on the base unit or the charger and let the batteries continuously charge for 24 hours before using. A beep indicates that the handset is properly placed on the base unit or the charger. The handset may take some time to power up and it may get warm during the initial charge. This is normal.
Charging the handset
An empty battery icon indicates the batteries need recharging. Place the handset on the base unit or the charger to recharge the batteries. A handset reaching a very low battery voltage level will go into sleep mode, displaying lOW BATT on the screen. Get into the habit of putting the handset on the base unit or the charger to charge when it is not in use to ensure the handset is always fully charged.
4 www.philips.com/faqs/dect
SETTING UP YOUR PHONE
|
|
|
> |
|