|
|
|
Categories
|
|
Information
|
|
Featured Product
|
|
|
 |
|
|
There are currently no product reviews.
 ;
Fast delivery, excellent resolution and complete. And above all, the best price ever !
;
Vielen Dank,
das war eine prima Sache. Habe das Serviceheft nach 3 Stunden herunterladen können. Qualität OK. Hat mir mit Erfolg bei der Fehlersuche und Reparatur meines
Nordmende Galaxy Mesa 9000 geholfen. Ich kann diesen Service bestens weiterempfehlen
A very good service.
Thank You!
;
everything i needed. it was easy to get. and this site is now my go to site for manuals.
 ;
Quality as promised it arrived fast. No problems what so ever
;
Good scan, very handy and it also includes the user manual. 122 pages in total.
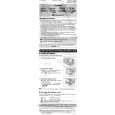
Tray (3)
B
� Confirm that the mark of the gear matches with the triangle mark on the reverse side of the tray in the tray close status. (The gear is rotated with the slider locks.) (Refer to Fig. B.)
Fig. A Gear (4) Triangle mark
Tray panel (4)
A
Tray (3)
Claws
Tray panel (4)
Position of the line Pickup mechanism assembly Gear (4)
Fig. 2-1-5 1-1-4. Front Panel and Tray 1. Remove the flexible cable (1). 2. Remove one screw (2) and remove the GND lead (5). 3. Release four claws and remove the front panel (4). 4. Pull out the tray (3) to this side.
Screw (2) GND lead (5)
Tray rack gear
Slider
Tray (3)
Marking
Triangle mark
Gear (4)
Claw
Fig. B
Tray (3)
Fig. 2-1-7 1-1-5. Rear Panel 1. Remove eight screws (1) and remove the rear panel (2).
Front panel (4) Flexible cable (1) Claws
Screws (1)
Fig. 2-1-6 Note: � Insert the tray (3) with the front side of the pickup mechanism assembly descended. (The slider positions to the left side.) � The gears are required to match their phases each other. After setting the gear (4) as shown in the figure �A�, insert the tray (3). When inserting a tray (3), push the rack gear side shown by the arrow. Fig. 2-1-8
Rear panel (2)
2-3
|
|
|
> |
|