|
There are currently no product reviews.
 ;
One address for rare manuals.Very good copy. Thank you.
Your
Klaus Husse
;
All ok. I pay 5 $ and now i have 92 pages of good scaned service manual for my oooooold akai. Now i will try to repair it.
;
good and ok, very nice , good and ok, very nice, good and ok, very nice
;
Super manual it contains all the things you need to service your Marantz 2100.
;
A very easy to understand and use manual. Well worth the money.
DEH-1100,11
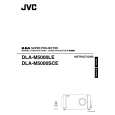
- Removing the Upper Frame
1. Remove six Springs A, two Springs B and four Screws. 2. Remove two Tabs situated on rear side of the Upper Frame, remove two Arms on the front side, then remove two Tabs on the front side.
B A A A A Upper Frame
Arm
A
Arm B A
- Removing the Carriage Mechanism
1. Disengage the Carriage Mechanism from the two dampers situated in the front side by driving it up, then disengage and remove the mechanism from the one damper by driving it up aslant into front side direction. Note : When assembling the Carriage Mechanism, coat the dampers with alcohol prior to the assembly.
Carriage Mechanism Section
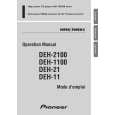
- Removing the Clamp Arm Assy
1. Remove a Spring A, a B and a Spring C. 2. Drive the Clamp Arm Assy up into rear side direction, then disengage the arm from its current position Finally, drive the assembly approximately 45 degrees upward, then slide the assembly toward right side to remove it.
A
Clamp Arm Assy Section B
C
49
|