|
There are currently no product reviews.
 ;
Another excellent aquisition. Fine detailed manual. Thanks
 ;
Good quality for the scan, complete, but as usual for Tascam, not so comprehensive !
;
great manual readable & easy to downlaod to be recommanded
;
Very useful, not the best scan, but definitely readable !
;
Complete service manual, good quality scan, great buy !
1
2
3
4
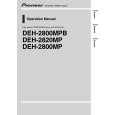
- How to remove the Load Carriage Motor Assy
1. Make the system in the carriage mechanism mode, and have it clamped. 2. Release the leads (orange and purple) of Load Carriage Motor Assy from the CD Core Unit and remove the holder. 3. Remove the Poly Washer, Change Arm, and Pickup Lock Arm. 4. Remove the two Screws (A) and the Bevel Gear Bracket (Note that the gears will come off). 5. Remove the two Screws (B) and the Gear Bracket (remove the CD Core Unit, if necessary), and remove all the gears. 6. Remove the two Screws (C) and the Load Carriage Motor Assy. Caution: When assembling the Load Carriage Motor Assy, move it to the direction shown in the illustration (1). When treating the leads of the Load Carriage Motor Assy, do not make them loose over the Feed Screw.
Gear Bracket Screw B Screw A Bevel Gear Bracket Poly Washer Change Arm Pickup Lock Arm
A
B
Load Carriage Motor Assy
Screw C
C
1
D
E
F
26
CX-3164
1 2 3 4
|