|
There are currently no product reviews.
 ;
Nice manual. Clear copy and very rare, to boot. Great price, too!
 ;
Excellent service manual. Complete service info. with schematics, step-by-step instructions and illustrations. Well worth the price!
;
Great product, helped me to restore vintage walkman cassette.
Just some pictures could be little bit more sharp and contrast
Thank you
;
I love older radio's and the service manuals that are sometimes hard to find. Was able to find a manual quite easily on this site.
;
Thank you for your shop manual! Your help was very useful - the device is repaired! Once again - Thank you! I wish you a successful business! Edward (Russia).
1
2
3
4
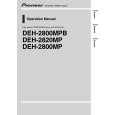
- How to remove the Load Carriage Motor Assy
1. Make the system in the carriage mechanism mode, and have it clamped. 2. Release the leads (orange and purple) of Load Carriage Motor Assy from the CD Core Unit and remove the holder. 3. Remove the Poly Washer, Change Arm, and Pickup Lock Arm. 4. Remove the two Screws (A) and the Bevel Gear Bracket (Note that the gears will come off). 5. Remove the two Screws (B) and the Gear Bracket (remove the CD Core Unit, if necessary), and remove all the gears. 6. Remove the two Screws (C) and the Load Carriage Motor Assy. Caution: When assembling the Load Carriage Motor Assy, move it to the direction shown in the illustration (1). When treating the leads of the Load Carriage Motor Assy, do not make them loose over the Feed Screw.
Gear Bracket Screw B Screw A Bevel Gear Bracket Poly Washer Change Arm Pickup Lock Arm
A
B
Load Carriage Motor Assy
Screw C
C
1
D
E
F
26
CX-3164
1 2 3 4
|