|
|
|
Categories
|
|
Information
|
|
Featured Product
|
|
|
 |
|
|
There are currently no product reviews.
 ;
Full Panasonic service Manual, as described, no problems
;
This place is amazing. Got our manual in a few hours. Print quality is excellent. Even the manufacturer didn't have this manual. The price was excellent. How many more stars can I give them? More than satisfied.
;
This was a very hard to find manual. The unit is long discontinued and Pioneer doesn't retain every manual for every model. Thanks owner's-manual.com!
 ;
I'm so glad I was able to find a site to download my missing manuals. Very reasonable prices and they kept me informed about the process and I had my manual within less than a day. The only thing I wish was an option is a 100% English version with no spanish or anything. But overall great site.
;
The manual is complete with excellent quality! One suggestion, show number of pages and weather it is multi-lingual. The AD 600 Manuel is about 76 pages and over half is non English. This results in a larger print job than usually needed. Having this information, one could select the desired pages for printing.
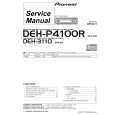
INSTALLATION MANUAL
Installation
Note:
� Before finally installing the unit, connect the wiring temporarily, making sure it is all connected up properly, and the unit and the system work properly. � Use only the parts included with the unit to ensure proper installation. The use of unauthorized parts can cause malfunctions. � Consult with your nearest dealer if installation requires the drilling of holes or other modifications of the vehicle. � Install the unit where it does not get in the driver�s way and cannot injure the passenger if there is a sudden stop, like an emergency stop. � The semiconductor laser will be damaged if it overheats, so don�t install the unit anywhere hot � for instance, near a heater outlet. � If installation angle exceeds 60° from horizontal, the unit might not give its optimum performance. (Fig. 1)
<ENGLISH>
Installation with the rubber bush
Holder After inserting the holder into the dashboard, then select the appropriate tabs according to the thickness of the dashboard material and bend them.
182
60°
Dashboard
(Install as firmly as possible using the top and bottom tabs. To secure, bend the tabs 90 degrees.)
DEH-3110
53
Rubber bush Screw
Fig. 1
Fig. 2
Removing the Unit
Insert the supplied extraction keys into the unit, as shown in the figure, until they click into place. Keeping the keys pressed against the sides of the unit, pull the unit out.
У�С��УС�
This product conforms to new cord colors. о од о дл о .
Fig. 3
Printed in Thailand о л
д
<CRD3093-A/N> EE
<99H00F0V01>
|
|
|
> |
|