|
There are currently no product reviews.
 ;
This is the ONLY copy of this manual I could find for a realistic price. Even Panasonic could not provide me with one.
The PDF is a very good copy and it helped me diagnose and find the fault with the unit I have.
;
Very complete and well reading drawings. Documentation is essential for successful repairs.Good documentation, with all that is necessary. This manual was what I was waiting with all the information necessary for the repairing I need it for. You must buy it if you want to do repairs or simply understand how it works.
 ;
Excellent service manual includes everything is need to repair this radio-caseete, how to disassemble, wiring diagram, all , waiting time until the download was only a few hours. I'm going to buy service manuals from here, are cheap and very good.Thank you.
;
Good service manual,i saved from scrapping this deck,is now fully functional.Thanks.
;
Found this to be the manual included with the original packinging, was helpfull but did not give any detailed repair instructions.
1
2
3
4
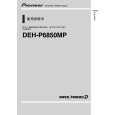
- How to remove the Load Carriage Motor Assy
1. Make the system in the carriage mechanism mode, and have it clamped. 2. Release the leads (orange and purple) of Load Carriage Motor Assy from the CD Core Unit and remove the holder. 3. Remove the Poly Washer, Change Arm, and Pickup Lock Arm. 4. Remove the two Screws (A) and the Bevel Gear Bracket (Note that the gears will come off). 5. Remove the two Screws (B) and the Gear Bracket (remove the CD Core Unit, if necessary), and remove all the gears. 6. Remove the two Screws (C) and the Load Carriage Motor Assy. Caution: When assembling the Load Carriage Motor Assy, move it to the direction shown in the illustration (1). When treating the leads of the Load Carriage Motor Assy, do not make them loose over the Feed Screw.
Gear Bracket Screw B Screw A Bevel Gear Bracket Poly Washer Change Arm Pickup Lock Arm
A
B
Load Carriage Motor Assy
Screw C
C
1
D
E
F
26
CX-3164
1 2 3 4
|