|
There are currently no product reviews.
 ;
Very good scanning quality. All schematics are very legible. Worth every cent !
;
Excellent quality, very quick download turnaround, will definately use again.
 ;
This is a awesome quality scan of the original Service Manual for Technics 8099.
Contains the circuit diagram, PCB layout, adjust/tune instructions as well.
Since this is my first buy here, i'm really glad! This site do works as intended/described, it's definitely not scam!
Мои рекомендации! Все мануалы настоящие!
;
Good Quality of the File.
You get the normal manual is incudet.
;
Very nice and real Service Manual, I didn't thought it actually exist in the real world at all.
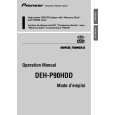
DEH-P90HDD,P900HDD
The numeral enclosed by a circle in the drawing indicates the order of removal.
- How to hold the mechanism unit
1. Hold the top frame and main frame. 2. Do not hold the front of the top frame tightly because its strength is low.
- How to remove the top frame and main frame
1. Remove the screws (4) and screws (2) of the top frame in the clamped state and remove the top frame. 2. After having removed the screws of the dampers (2) on the right and the dampers, remove the main frame. 3. Remount the product connector with the frame removed and eject a disk. Top Frame
Main Frame
Disk
Damper Damper
- How to remove the clamper arm assy and guide arm assy
1. Remove a total of three right, left and rear screws and remove the clamper assy. 2. Remove the left spring and remove the torsion spring hook of the right fulcrum unit. 3. Remove the E ring of the left fulcrum and remove the guide arm assy. Guide Arm Assy
Clamper Arm Assy
112
|