|
There are currently no product reviews.
 ;
Great and very well scanned Service Manual, also very fast download - Recomended !
;
I'm quite impressed. I had to wait 24 hours for my manual (quite a rare one) but I got it and the quality was good. Also, from trawling the web, these prices are by far the best.
;
Manuale perfetto. Ottimo e utilissimo. Grazie a questo manuale ho potuto realmente risolvere il complesso problema della stampante.
;
Manuale perfetto. Ottimo e utilissimo. Grazie a questo manuale ho potuto realmente risolvere il complesso problema della stampante.
 ;
Was very fast and accurate service. Just what I needed. I recommend to everyone.
1
2
3
4
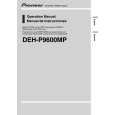
- Removing the Gear Unit
A
Move the Arm Unit to the CLOSE POSITION. (Fig.3)
1
Remove the four screws and then remove the Gear Unit. (Fig.6)
*) When you remove or intall the Gear Unit, do so with the Arm Unit in the CLOSE POSITION.
1
B
1
1
1
Gear Unit
Fig.6 - Checkpoints for the Gear Unit
C
1. When you disassemble or assemble the Gear Unit, do so with the Arm Unit in the CLOSE POSITION. Make sure that the Arm Unit is in the CLOSE POSITION by seeing the other side of the unit through the fully circular hole shown in the figure. 2. When you install the motor, fix the screws holding the motor in the direction of the arrow shown in the figure.
Gear Unit R
2
1
D
Gear Unit L
E
F
66
1 2
DEH-P9600MP/XN/EW
3 4
|